Do-it-yourself summer kitchen in the country
In the fresh air, not only the appetite is stronger, but food is digested much better. In warm weather, you do not want to sit indoors at all. Preservation for the winter is also easier to do outside. In the article we will tell you how to build a summer kitchen in a summer house with your own hands, we will demonstrate diagrams, drawings, photo and video instructions.
Choose a type
All types of summer kitchens can be classified into two categories:
- open;
- closed.
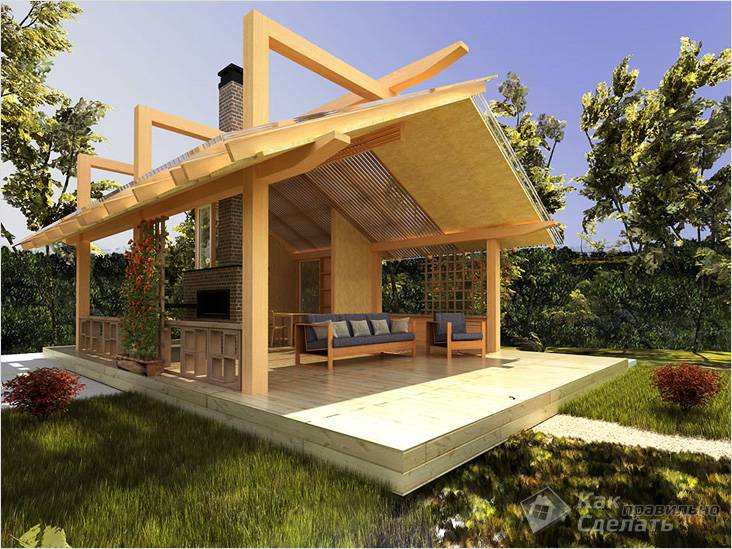
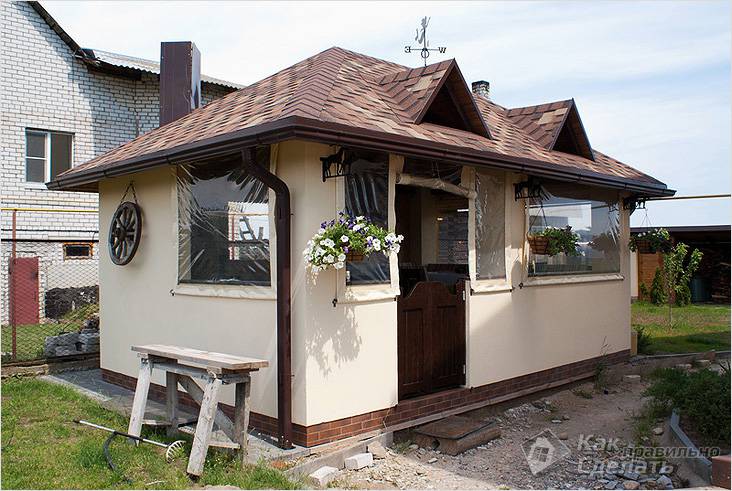
Closed kitchens are like a small house-like structure that often doesn't have much insulation. The advantage of this solution will be protection from insects, the best protection from the weather, as well as from the wind. An open kitchen option on one or more sides can be protected with a fabric, wood or other wall. The advantage of such a solution will be greater unity with nature. Among the open types of buildings, there are options:
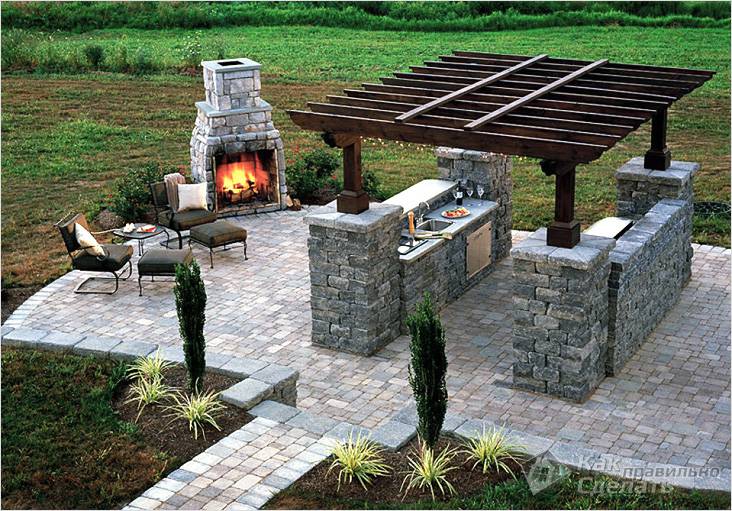
- With barbecue. In this case, you have the advantage of cooking your favorite dish on an open fire. Barbecue will be available in any weather. If you additionally mount the oven, then you can please your friends with pizza.
- With gazebo or pergola. Nice to sit among the greenery. This is exactly the solution in which the entire structure will eventually be shrouded in grapes, ivy or other climbing plants.
- Canopy adjoining the house. The easiest way to build. Requires the least investment. But there is a downside. When cooking, all fumes and smoke will go towards the house. This can lead to damage to walls or other finishing material.
Stages of preparation

Once you have chosen one of the possible options, it's time to create a small project.
- We choose a location. It is good when it is possible to place the kitchen in a cozy garden, where there is a pleasant atmosphere of tranquility. At this stage, it is necessary to take into account the proximity of the location of various communications. They will definitely be needed. Electrical appliances will require wiring. When cooking, you can’t do without water and after it you need to put it somewhere. Do not place the building close to driveways and roads. Then your meal will not be spoiled by unpleasant odors. If there is a toilet outside, then it is better to leave it as far away as possible.
- We stop at the material for construction. If a closed kitchen is planned, then you can approach it as a frame building, in which case you will need wood. A good option would be a building made of foam blocks or bricks. The open one will most likely be made of wood, or one or two of its walls will be made of the material that was listed earlier.
- Decide on the roof. Soft tiles will look great on an open building, but this is a rather expensive solution, although it cannot be ruled out, because the roof area will be small. A good option would be metal tile or corrugated board. Perhaps, while waiting for your turn, you have sheets of slate or ondulin - they will also work.
- The project should also take into account what equipment is planned to be purchased for the summer kitchen.

Foundation
The summer kitchen is usually conceived as a lightweight structure. This means that the foundation can immediately act as a floor, and, perhaps, pouring is not required at all.
- First you need to clear the selected area of all debris and vegetation.
- A small layer of top soil is removed.
- One of the corners of the future building is indicated with a wooden peg or a metal rod. Next, three more elements are installed. To correctly position them, it is necessary to measure the diagonals for identity. A fishing line or strong twine is stretched between them, which will serve as a guide.
If the building will consist of a canopy, then after these steps you can proceed as follows:
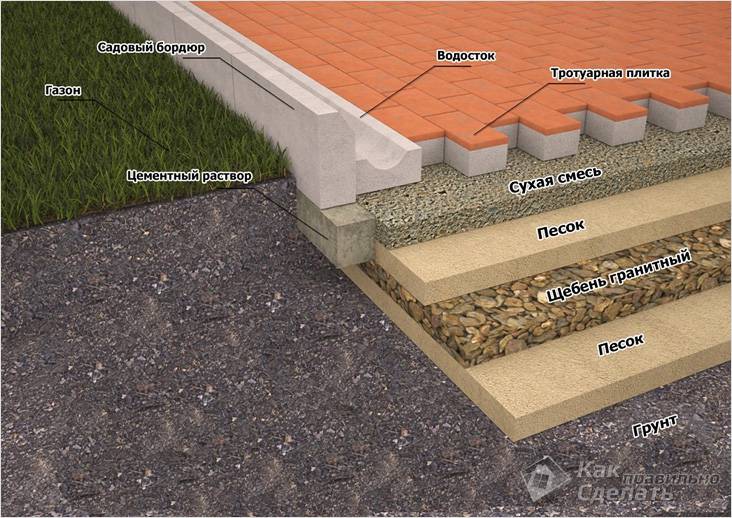
- The entire perimeter of the marked area is dug to a depth of 30 cm.
- The bottom is leveled and compacted.
- Sand is poured inside with a layer of 10-15 cm. It is also leveled and well rammed.
- The remaining space is filled with screenings and the final leveling is performed.
- Further, on our “pie”, which has been prepared, paving or other tiles, which are intended for the street, are laid. This can be done on a dry cement mortar, which, after spilling with water, will fix the entire base well.
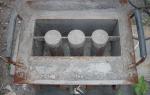
- Pits are dug at four corners, their depth should be at least 50 cm. Formwork is installed inside. A crate is made from the reinforcement, which will be the basis of the reinforced concrete structure. It is placed inside and filled with a solution. With the help of a vibrator, the entire mixture is rammed. While the concrete has not yet hardened, two metal plates are inserted into the middle, to which we can fix wooden poles that will support the walls and roof.
This version of the base will be relevant in the case when the soil is sufficiently dense. In cases where groundwater can come very close to the surface or displacements of the upper layer are noticed, a more stable foundation must be provided. Also, if you plan to build a stove or barbecue on such a foundation, then you will need to lay separate concrete supports for them.
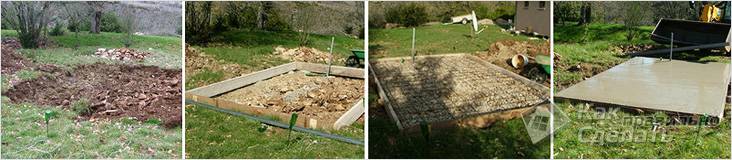
In order to make a foundation slab, we will need to follow the first three steps from the previous instructions. Next, we take on the following:
- We prepare 8 pieces of reinforcing bars. Four of them should be 10 cm shorter than one of the sides of the future structure, 4 others 10 cm shorter than the other. If the building is square, then they will all be the same size.
- We lay four of them in the form of our future structure and fix them together. Further, every 40 cm we tie longitudinal and transverse jumpers. In the same way we prepare the second grid. We connect the two gratings with jumpers to such a height that the future plate rises above the surface by at least 5 cm.
- We lower the entire structure into the middle of the dug hole, install the formwork and fill it with concrete. We ram with a vibrator. We level with slats and let it stand for several weeks.
- In fresh concrete around the perimeter, in increments of a meter, metal plates can be placed to the width of the future beam for the walls. Or it can be done only in the corners.
It is very important that the floor is above the ground. This will prevent rainwater from seeping in. It is also good to make a slight slope of the floor so that the precipitation that is carried by the wind can flow freely into the drain or simply through the door.
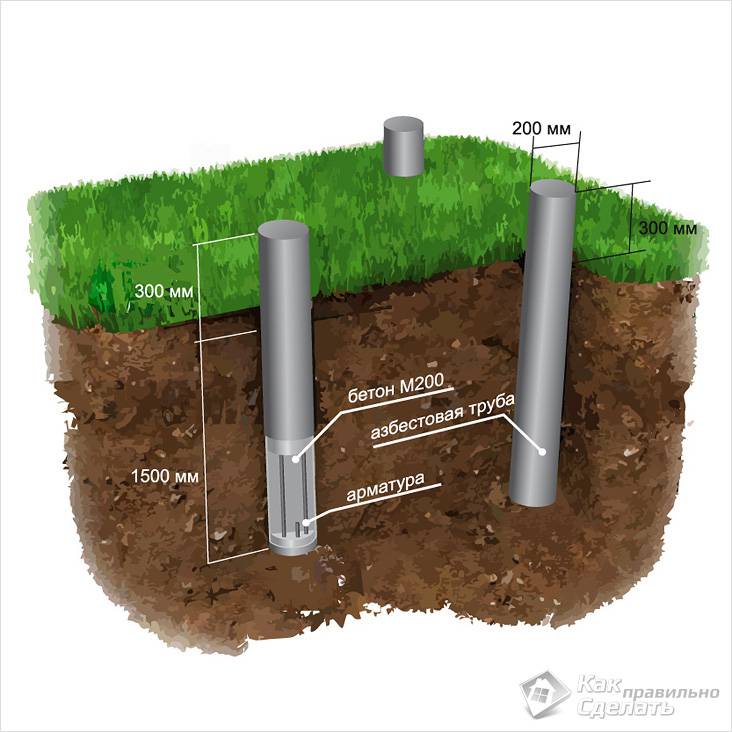
In the case when it is planned to build a closed kitchen made of brick or foam block, this version of the foundation may be enough. Also, for these needs, you can build a tape shallow or columnar foundation. In this case, such a large-scale excavation is not carried out.
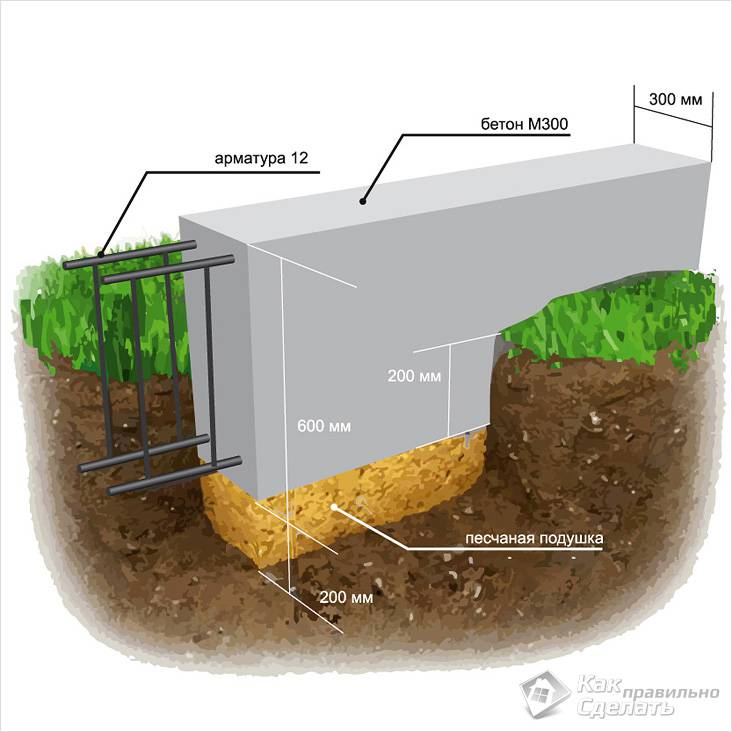
- A trench is dug to a depth of 50 cm around the entire perimeter of the future kitchen. The width will depend on the thickness of the walls. In any case, the foundation should be 10–15 cm wider.
- A layer of sand is poured to the bottom, which is leveled and spilled with water.
- A metal base-lattice is made according to the principle, as in the previous instructions. She fits into the trench.
- Formwork is installed with the expectation that the future foundation rises 20–30 cm above the ground.
- Pour the cement mortar, ram and level it. Let stand 2-3 weeks.
The supply of all communications must be carried out in parallel with the laying of the foundation, so that later you do not have to hammer holes in it or dig under it. So that the pipes are not clogged with mortar, they must be closed in advance with a cloth and plastic oilcloth.
open kitchen

This option can be built most quickly. We have already laid the foundation and the anchorage for the supports. If you are planning for the kitchen to be closed on one or both sides with walls made of brick or other material, then the first step is to start building these partitions.
- At the corners of future walls, we dig into the ground a metal square pipe or a profile measuring 50 × 50 mm. Let's level it up. We do this so that the planks are close to the masonry. They will serve as our guide.
- We stretch the line between them. We raise it to the height of the first row of bricks to be laid. Let's level it up.
- We prepare a cement-sand mortar in a ratio of 1: 3. This will be sufficient for our purposes.
- We produce masonry, focusing on a stretched fishing line, and also periodically recheck ourselves with a level.
- As soon as the first row is completed, we raise the fishing line for the next and so on until the very end.
- In order to make the structure more stable, a reinforcing mesh can be laid in the seams.
If you do not plan on having walls of this nature, then the process will be much easier.
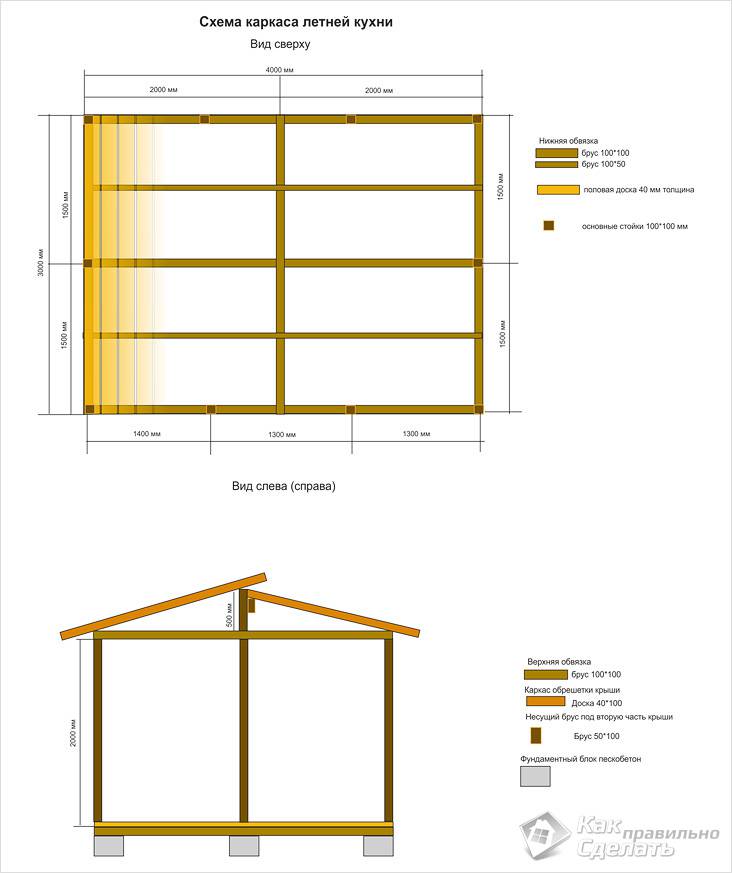
- To the metal plates that we laid during the manufacture of the foundation, we fasten the beam, which will serve as a support. When the whole structure is of great length, then it is necessary to foresee the need to install 3-4 pillars on one side. Their length should be equal to the height of our building, and the dimensions of the sides should be 15 × 15 cm or 15 × 10 cm.
- We expose them by level so that they are strictly vertical. The bars of one wall should be longer so that we can organize the roof slope.
- We immediately strengthen our columns with the help of the upper strapping. It can be made from the same logs. We fix it with metal corners.
- To give greater stability to the entire structure, you can install two jibs near each column. They can be fixed to the support with self-tapping screws, and to the base - with an anchor bolt.
- We mount beams for our future roof. In order for them to better hold in the places where they adjoin the harness, it is better to perform gashes. We fix with metal corners.
- We make a crate for flooring, as recommended by the manufacturer. We lay roofing material.
- To create more comfort, one side (or more) can be sewn up with a wooden clapboard or block house. On the other - to make a wooden lattice. You can equip supports for climbing green plants.
In the case when it is planned to build a pergola, nothing more needs to be done after laying the ceiling beams. They can be covered with stain or varnish. Further, the plants themselves will do their job, creating a shadow when they are fully grown.
closed kitchen
At the design stage, it may have been decided to build walls from foam blocks or bricks, then this can be done according to the same principle with the installation of vertical landmarks, which was mentioned above. The thickness of the walls may not be too large. In some cases, laying in half a brick is allowed. But always consider the weight of the future roof. In the future, the outside of the building can be sheathed with siding or a block house. For interior decoration, a block house, lining or other material that will be resistant to frost is also suitable, because it is unlikely that someone will constantly heat the room in winter.
A bar is laid on the walls, which will act as a Mauerlat. Its size can be 10 × 15 cm. It is fixed with anchor bolts or studs, which must be walled up during the construction of walls. Under it, it is imperative to lay waterproofing in the form of roofing material or bikrost. A truss system is installed on the logs. It can be for both a gable and a shed roof (for this option, it will be enough to make one wall higher than the other, then beams are simply installed between them). A crate is mounted on the beams and the roofing is laid. From the inside, the ceiling is hemmed.
![]()
You can go simpler and stop at the wireframe version. For it, we need bars of the same size as for the vertical posts from the instructions for the open kitchen. From them we make the foundation. We lay them around the perimeter of our foundation on two layers of roofing material or bicrost, which will serve as waterproofing. We make a dressing between them. To do this, on the edge of each log there is a recess half the depth and a width equal to the width of the log. Checking diagonals. We fix them together with self-tapping screws and internal metal corners. Next, we fix it to pre-prepared plates or anchors to the foundation.
We mount the corner support pillars from the same timber. In increments of 60 cm, we install additional vertical supports from a board measuring 10 × 5 cm. For greater rigidity, we fasten the jibs for each main support. We carry out the upper trim and install the truss system for the future roof. We do this by analogy with the option of an open kitchen.
finish line
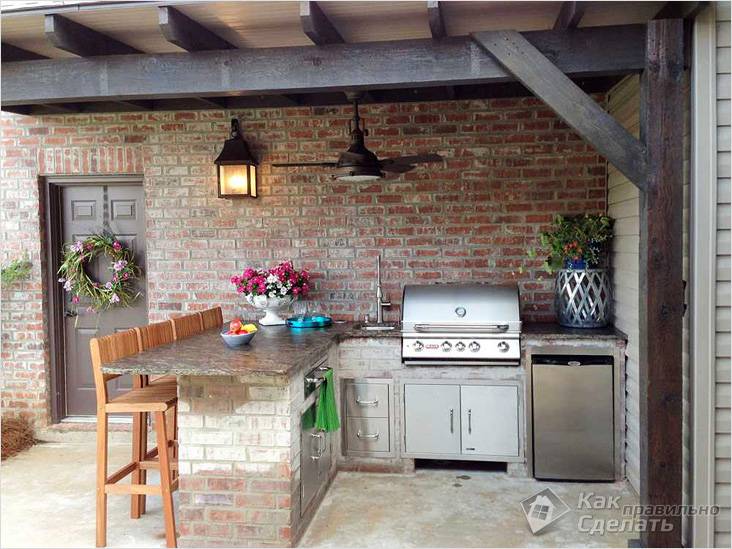
Even if our kitchen is planned to have a barbecue or stove, this does not exclude the presence of a gas or electric stove, which is much more convenient to use. It is necessary to take care of the installation of a sink, a mixer, as well as a stand for dishes on which it will dry. It would be nice if there is a locker in which you can hide cutlery, as well as pots. You need to take care of the dining table, as well as comfortable furniture on which you can relax. For greater comfort, it is better to carry out the main and decorative lighting.
For an open kitchen project, it is best to ensure that all lighting fixtures are preferably IP68 rated. In this case, you do not have to worry about any elements being damaged by rainwater.
Don't approach your summer kitchen project casually. Let it in some sense be a design decision. After all, it will serve not only as a place for eating, but also as a recreation area with family and friends.