Garden barbecues (36 photos) - characteristics and designs
Outdoor cooking has its own charm, especially when it's barbecue. Recently, this method of cooking meat has become increasingly popular. Typically, such a hearth is made of brick, although there are models made of metal, as well as other materials.
Before we start building such a structure, it is worthwhile to figure out if it is needed at all in your summer cottage? Perhaps there are simpler models that can replace it.
Barbecue - what is it
Any reference book will tell you that this is the name of an open flameless type oven, where natural air circulation occurs. The very concept of this word comes from "barbaric".
However, it is far from clear how barbecue differs from quite. For example, with a grill, everything is clear - the device is covered with a lid, and thanks to the holes in the brazier at the top and bottom, forced draft is created.

If you don’t go down to particulars, you can decide that both the brazier and the barbecue are one and the same.
Let's compare:
- both there and there you can bake a semi-finished product using the heat of smoldering (without flame) coals in an open brazier;
- due to the uniformity of heating, IR radiation from the hot walls of the hearth improves;
- both devices allow you to bake or fry meat (vegetables) on a skewer and a grill.
However, everything is not so clear, especially if you look at the location of the skewer or grill. In the barbecue they are installed from above, at the same time in the barbecue they have a side 200-250 mm high, i.e. in fact, the semi-finished product is placed in the recess.

What do we get
If this difference may not affect the appearance, it is very noticeable in culinary features. In the brazier, the product comes into very little contact with smoke, since it is almost immediately blown away even by a small air flow.
At the same time, the side:
- allows you to delay very light, almost invisible smoke. This allows the product to be slightly smoked;
- holds the hot air cushion. That is why on a barbecue it is possible to easily get an appetizing crust without damaging the product. It is sometimes very difficult to do this on the grill, most often the barbecue turns out to be burnt.
Such a crust not only makes the dish appetizing, it makes it possible to change the physical and chemical structure of the product. With its help, it is possible to keep moisture in the piece, which allows you to do two things at the same time - bake and boil the meat.

Thanks to this, you do not need to carefully select the source products, which cannot be said about the grill, otherwise you will not chew the meat. In a barbecue, sausages do not burst, and are fried like a nice little variety of vegetables, including tomatoes. Another fact is that old barbecued beef turns into tender young beef under a crispy crust.
The choice is made
After making a decision, you can start building a barbecue in the country. It is better to make a stationary option, although there are also summer residents who like to turn improvised stones into a Celtic hearth. Do not forget to make an additional fence around.
Tip: folding options very often resemble a regular barbecue, so you won’t be able to get the desired result in the end.
An important feature of the barbecue hearth that cannot be ignored is that it does not need strong traction. Otherwise, your entire air-smoke cushion will simply go into the atmosphere, turning the hearth into a simple brazier.
Of course, you can bake on it, but you won’t be able to get a “barbecue” taste and tenderness. It is known from history that such Celtic hearths were made in huts and caves, where they used the “black-burning” method, so no one cared about the chimney.
Tip: to protect the cooker from rain or from wind, which can blow the flame too much, it is advisable to install a chimney with a smoke hood on it.
Its height should not be large, about 1-1.2 m above the coals. You should also make a draft adjustment on the chimney, which is often called a top.
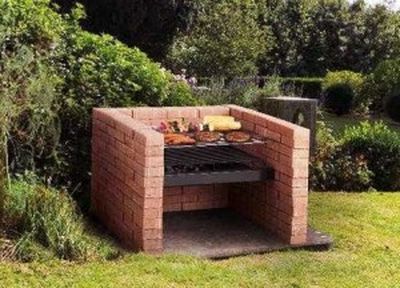
In the photo - a traditional barbecue hearth
Design Options
We offer you two standard options for consideration:
| Traditional |
|
| "Barbaric" | This model is more expedient, moreover, it simplifies work and saves bricks. In this case, segments of metal bars Ø6-8 mm should be embedded in the seams. If there are a lot of them, you can fine-tune the heating of the product. |

The disadvantage of this design, in addition to being exposed to the weather, is the difficulty of working with coals, as a result of which you can even get burned if you step on them with your foot. So we recommend doing two-story.
The niche under the brazier can be used for drying firewood, and it is laid flat from one row of bricks. To do without complex structures, use a metal sheet in a frame of channels or corners for this, as the load will be small.
Tip: you should not use gas or foam blocks on a cement-sand mortar on the lower tier, you will then have to spend money on finishing to make the design look aesthetic.
Foundation
A simplified version is suitable for our design, since its weight is small and there will be no noticeable shrinkage.
The instructions below will show you how to do it:
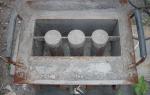
- Dig a trench 3/4 deep of a shovel bayonet, but if you have gravel or sand nearby, then bayonet.
- Put concrete posts for vine trellises on the sand and gravel bed or directly into the trench, their price is lower than those used for fences (they are also possible), their weight is less, and they are trapezoidal in section. Lay them wide side up.
- Take a grinder and cut off the wire rigging loops from the posts.
- Use a wooden tamper to nail them horizontally.
- Remove the sod and soil on the site between them to a depth of 3/4 of the trench.
- Make a formwork and fill the area with densely mixed clay with your own hands, which you level with a trowel.

- Without stopping, pave over the clay with stone tiles, cobblestone, granite, diabase, or other hard stone.
- Go through the rammer and check the level.
- You can start laying out the body of the furnace, but without stepping on the floor, which will begin to dry out a little. It is undesirable to stomp it until you have made 3-5 fires.
masonry
- Use a clay solution of medium fat content.
- An ordinary brick is suitable, you should not overpay for a refractory one, since the temperature of the flame during heating will not exceed 800˚С due to the lack of artificial draft, the coals heat up to 600˚С.
- Bind the seams only between rows. Corner bricks - three-quarter.
- For convenience, you can start laying the first rows along the guides. In this case, stick even metal corners into the ground at the outer corners of the foundation and set them on a plumb line. Remove the guides after the 4th row, as it will already be easier to navigate the folded.
- Drying the structure takes about 5 days in summer, up to 20 in autumn, especially if the weather is cloudy. Don't forget to cover the hearth from the rain. It will eventually dry out while working.
- You can use the hearth after it has been heated well once.

Conclusion
From this article, we hope you have learned a lot about barbecue. Now you understand its difference from the usual barbecue and what are its advantages. When making a hearth stove, we do not think that you will encounter difficulties. The video in this article will help you find more information on this topic.