Parent meeting in preschool. Drawing circle presentation
To use the preview of presentations, create a Google account (account) and sign in: https://accounts.google.com
Slides captions:
Topic: "Non-traditional drawing techniques in preschool educational institutions and their role in the development of preschool children." "The origins of abilities and the gift of children at their fingertips. Figuratively speaking, the thinnest threads and streams come from the fingers, which feed the source of creative thought. In other words, the more skill in a child's hand, the smarter the child." V.A. Sukhomlinsky.
In the process of non-traditional drawing, the child develops comprehensively. Such classes do not tire preschoolers, children remain highly active, working capacity throughout the time allotted for the task. Non-traditional techniques allow the teacher to carry out an individual approach to children, take into account their desire, interest. Their use contributes to the intellectual development of the child, the correction of mental processes and the personal sphere of preschoolers.
Many types of non-traditional drawing contribute to an increase in the level of development of hand-eye coordination (for example, drawing on glass, painting on fabric, drawing with chalk on velvet paper, etc.), as well as coordination of fine motor skills of the fingers.
The purpose of my work is to create pedagogical conditions for the development of children's creative imagination through the use of non-traditional drawing techniques and techniques. Having studied the works of various authors, I found a lot of interesting ideas and set myself the following tasks: To form children's technical drawing skills. Introduce children to various non-traditional drawing techniques. Learn to create your own unique image using various drawing techniques.
Studied work experience: I.A. Lykova “Program of artistic education, training and development of children aged 2-7 years. "Colored palms"; A.V. Nikitina "Non-traditional drawing techniques"; G.N. Davydov "Unconventional Drawing Techniques"; R.G. Kazakov "Drawing classes with preschoolers". At the preparatory stage, I got acquainted with the methodological literature of various authors, such as A.V. Nikitina "Non-traditional drawing techniques in kindergarten", I.A. Lykova - "Methodological guide for specialists of preschool educational institutions", T.N. Doronova - "Nature, art and visual activity of children" R.G. Kazakova "Fine activity in kindergarten".
1. Preparatory - introductory 2. At the second stage - reproductive, she set the task: to acquaint children with various means of expression. 3. The third stage is constructive. The task of this stage is to teach children to perform collective work, to organize joint activities (with each other, with a teacher) Stages:
1. Handwriting 2 . Using a signet 3. Drawing with a feather 4. Drawing with a finger. 5. Monotype. 6. Stencil drawing with a swab. 7. Drawing by poking. 8. Blotography. 9. Spray. 10. Grating. 11. Drawing with soap bubbles. 12. Drawing with crumpled paper 13. Instead of a brush - a hole punch. 14. Nitkografiya. Methods and techniques of non-traditional drawing
With children of younger preschool age it is recommended to use: drawing with fingers; imprint with potato prints; palm drawing. Children of middle preschool age can be introduced to more complex techniques: poke with a hard semi-dry brush. foam printing; stopper printing; wax crayons + watercolor; candle + watercolor; leaf prints; palm drawings; drawing with cotton swabs; magic ropes. And at older preschool age, children can master even more difficult methods and techniques: sand painting; drawing with soap bubbles; drawing with crumpled paper; blotting with a tube; landscape monotype; screen printing; subject monotype; blotting ordinary; plasticineography.
I used the following means - the joint activity of the educator with the children, - the independent activity of the children. I used the following methods: informational verbal, practical. The informational method includes the following technique: - examination - observation - excursion - teacher's sample - teacher's demonstration The verbal method includes - conversation - story - use of teacher's samples - artistic word The practical method is a method aimed at consolidating the knowledge and skills of children. This is a method of exercises that bring the skill to automatism, it includes the technique of repeating work on drafts, performing shaping movements with the hand.
Criteria 2 Junior group Middle group Senior group Preparatory group % manifestation 1. Artistic and aesthetic perception 18 22 29 41 2. Display of creativity 21 29 33 54 3. Display of initiative 20 34 42 59 4. Display of independence 23 36 48 61 5. Display of individuality 21 43 52 59 6. Using expressive means 24 45 51 64 7. Mastering the ways of creating an image 28 42 54 60 8. Seeing artistic images 19 39 46 62 9. Planning activities 18 28 51 70 10. Skills and ability to use tools 17 28 49 76 Analysis of the effectiveness of drawing skills and abilities by groups: 1. Preparatory stage:
Criteria 2 Junior group Middle group Senior group Preparatory group % manifestation 1. Artistic and aesthetic perception 19 24 32 45 2. Display of creativity 23 30 34 56 3. Display of initiative 22 34 45 60 4. Display of independence 24 37 49 65 5. Display of individuality 25 45 54 63 6. Using expressive means 23 47 53 65 7. Mastering the ways of creating an image 30 44 56 67 8. Seeing artistic images 22 41 49 62 9. Planning activities 20 29 54 85 10. Skills and ability to use tools 21 35 50 86 2. Main stage:
Criteria 2 Junior group Middle group Senior group Preparatory group % manifestation 1. Artistic and aesthetic perception 29 34 38 46 2. Display of creativity 33 37 38 56 3. Display of initiative 28 39 48 64 4. Display of independence 32 39 49 66 5. Display of individuality 35 48 53 65 6. Using expressive means 33 49 57 67 7. Mastering the ways of creating an image 34 48 59 67 8. Seeing artistic images 29 46 51 76 9. Planning activities 28 35 57 85 10. Skills and ability to use tools 29 38 58 88 3. Final stage:
Conclusion: after analyzing the effectiveness of drawing skills and abilities in groups engaged in non-traditional drawing techniques, I came to the conclusion that there is a positive trend in children of the preparatory group, since they have mastered many types of non-traditional drawing techniques and fine motor skills of fingers are more developed.
Conducting classes using non-traditional techniques contributes to: - Removing children's fears; - Develops self-confidence; - Develops spatial thinking; Teaches children to freely express their intention Encourages children to creative searches and solutions; Teaches children to work with a variety of materials; Develops a sense of composition, rhythm, color, color perception; sense of texture and volume; Develops fine motor skills of hands; Develops creativity, imagination and flight of fancy; While working, children get aesthetic pleasure.
View slides in large size
Presentation - Non-traditional drawing technique
3,534
viewing
The text of this presentation
Non-traditional drawing technique

"… This is true! Well, what is there to hide? Children love, love to draw! On paper, on asphalt, on the wall. And in the tram on the window .... "

Drawing using non-traditional techniques -
this is a drawing aimed at the ability to deviate from the standard. The main condition: to think independently and receive unlimited opportunities to express your feelings and thoughts in a drawing, immerse yourself in the wonderful world of creativity.

The use of non-traditional art activities techniques:
contributes to the enrichment of children's knowledge and ideas about objects and their use, materials, their properties, methods of application; stimulates positive motivation in a child, causes a joyful mood, relieves fear of the drawing process; gives you the opportunity to experiment; develops tactile sensitivity, color difference; promotes the development of hand-eye coordination; does not tire preschoolers, increases efficiency; develops non-standard thinking, emancipation, individuality.

Non-traditional ways of depiction in drawing.
Image methods
DIY drawing (drawing with fingers and palms)
Wet painting
Threadography
Drawing with a stamp bonded drawing, imprint)
Monotype
And other
Grattage
Blot Games (Blotography)
Drawing with a comb, toothbrush
Groats drawing
Plasticineography

Drawing with fingers and palm.Age: from two years.Means of expression: spot, color, fantastic silhouette.Materials: wide saucers with gouache, brush, thick paper of any color, large sheets, napkins.Image method: the child dips his hand into gouache (finger) or paints with a brush (from the age of five) and makes an imprint on paper. They draw with both right and left hands, painted in different colors. After work, the hands are wiped with a napkin, then the gouache is easily washed off.

Print with prints from vegetables and fruits Age: from three years. Expressive means: stain, texture, color. Materials: a bowl or a plastic box, which contains a stamp pad made of thin foam rubber soaked in gouache, thick paper of any color and size, potato stamps. Method of obtaining an image: the child presses the signet against the ink pad and makes an impression on paper. To get a different color, both the bowl and the signet change.

Styrofoam, foam rubber imprint Age: four years. : the child presses the foam, foam rubber to the stamp pad with paint and makes an impression on paper. To get a different color, both the bowl and the foam are changed.
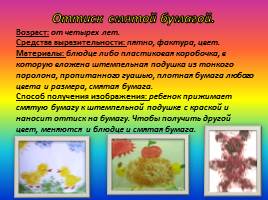
Crumpled paper print.Age: from four years.Means of expression: stain, texture, color.Materials: a saucer or a plastic box, which contains an ink pad made of thin foam rubber impregnated with gouache, thick paper of any color and size, crumpled paper.Method of obtaining image: the child presses the crumpled paper to the ink pad and makes an impression on the paper. To get a different color, both the saucer and the crumpled paper change.

Leaf prints.Age: from five years.Means of expression: texture, color.Materials: paper, leaves of different trees (preferably fallen), gouache, brushes.Image method: the child covers a tree leaf with paints of different colors, then applies it to the painted paper side to receive the print. Each time a new leaf is taken. The petioles of the leaves can be painted with a brush.

A poke with a hard, semi-dry brush. Age: any. Means of expression: texture of color, color. Materials: a hard brush, gouache, paper of any color and format, or a cut-out silhouette of a fluffy or prickly animal. paper, held vertically. When working, the brush does not fall into the water. Thus, the entire sheet, contour or template is filled. It turns out an imitation of the texture of a fluffy or prickly surface.

Age: from 2 years old. Expressive means: stain, texture, color. Materials: a saucer or a plastic box, which contains a stamp pad made of thin foam rubber soaked in gouache, thick paper of any color and size, crumpled paper. Method of obtaining an image: the child presses wrinkled paper to the ink pad and impresses the paper. To get a different color, both the saucer and the crumpled paper change.
Packing with cotton swabs, pencil

Wax crayons (candle) + watercolor. Age: from four years. Expressive means: color, line, stain, texture. Materials: wax crayons, thick white paper, watercolor, brushes. Method of obtaining an image: the child draws with wax crayons on white paper. Then he paints the sheet with watercolor in one or more colors. Drawing with crayons remains unpainted. Candle + watercolor Age: from four years. Expressive means: color, line, spot, texture. Materials: candle, thick paper, watercolor, brushes. Method of obtaining an image: the child draws with a candle "on paper. Then he paints the sheet with watercolors in one or more colors. The drawing with a candle remains white.

Subject monotype.Age: from five years.Means of expression: stain, color, symmetry.Materials: thick paper of any color, brushes, gouache or watercolor.Image method: the child folds a sheet of paper in half and draws half of the depicted object on one half of it ( objects are chosen symmetrical). After drawing each part of the subject, until the paint has dried, the sheet is again folded in half to obtain a print. The image can then be decorated by also folding the sheet after drawing a few decorations.

Landscape monotypeAge: from 6 years Expressiveness means: spot, tone, vertical symmetry, image of space in the composition. Materials: paper, brushes, gouache or watercolor, wet sponge, tile. How to get an image: the child folds a sheet of paper in half. On one half of it, a landscape is drawn, on the other, its reflection in a lake, river (imprint) is obtained. The landscape is done quickly so that the paint does not have time to dry. Half of the sheet intended for printing is wiped with a damp sponge. The original drawing, after it has been imprinted, is enlivened with colors so that it differs more from the print. For monotype, you can also use a sheet of paper and tiles. A drawing is applied to the latter with paint, then it is covered with a sheet of paper. The landscape is blurry.
Tatiana Laskovets
Presentation "Non-traditional drawing techniques in preschool educational institutions"
Drawing unconventional ways in kindergarten.
Preschool childhood is a very important period in the life of children. It is at this age that every child is a little explorer, with joy and surprise discovering an unfamiliar and wonderful world around him.
One of the main activities of children attending a preschool educational institution in all age groups is drawing.
My experience with children in kindergarten showed: exactly non-traditional drawing techniques create an atmosphere of ease, openness, promote the development of initiative, independence in the classroom.
The result of visual activity cannot be good or bad, the work of each child is individual and unique. Drawing in these ways, children are not afraid to make mistakes, since everything can be easily corrected, and something new can be easily invented from a mistake, and the child gains self-confidence, overcomes "fear of a blank sheet of paper" and begins to feel like a little artist. He has an INTEREST, and at the same time a DESIRE paint. Paint You can do anything, anywhere, anytime! The variety of materials poses new challenges and forces us to come up with something all the time.
So, what about non-traditional drawing techniques: cereal drawing, wet painting, nitkography, monotype, blotography, cabbage leaf pattern, toothbrush drawing, drawing fingers and palms, stamp drawing(printing, scratching and much more.
Introducing children to non-traditional drawing techniques I started in elementary school with drawing fingers is the easiest way to get an image. This way drawing gives the child freedom of action. The kid puts his finger in gouache and puts dots, spots on paper.
I started the work with one color, gave the opportunity to try different movements, leave different prints,
and then gave two or three colors ( "Grape", "Kid", "Autumn bushes", "Decorate the tree" and etc.).
Later taught hand draw children. Children love this method drawing("Cockerel", "Sun").
With pleasure, the guys mastered drawing technique corks and seals from potatoes, carrots, apples. This technique allows you to repeatedly depict the same object, composing a variety of compositions from its prints, decorating them with postcards, napkins, scarves, etc.
The child presses the signet against the ink pad and makes an impression on a sheet of paper. To get a different color, both the bowl and the signet change.
We painted: "Flowers rejoice in the sun"
"Apples"
"Flowers"
"Butterflies" and many others. others
Drawing cotton swab and pencil
It is very difficult for a child to hold a pencil correctly in his hand. In addition, it is necessary to put pressure on it so that a trace remains on the paper. Easier to start learning drawing with cotton swabs. It will be more convenient for small fingers to hold a light stick, and the drawing will turn out by itself. This kind drawing refers to an unconventional technique, which is ideal for kids doing in drawing first steps, that is, strokes.
In general, the process drawing cotton swabs comes down to the fact that the child is offered a sheet of paper with a ready-made outline drawing. At first, it is better to use paint of only one color so that the crumbs are not tempted to arrange multi-colored splashes or mix all the colors together. Dots can draw everything whatever you want - a dragonfly, fish, butterfly, snake, tree, apple, etc.
No less interesting for the child drawing technique with foam or sponge, the child presses the foam, foam rubber to the stamp pad with paint and makes an impression on paper. To get a different color, both the bowl and the foam are changed.
Here we draw on the topic "Golden Autumn"
Interesting for children crumpled paper drawing technique.
Image Acquisition Method: the child presses the crumpled paper to the ink pad and makes an impression on the paper. To get a different color, both the saucer and the crumpled paper change.
These are the original cat and hedgehog we got.
Also at drawing with this technique it is easy to mix colors, depicting the colorfulness of autumn leaves, sky, grass.
taught children paint"Poke with a hard semi-dry brush". The child lowers the brush into the gouache and strikes the paper with it, holding it vertically. When working, do not lower the brush into the water. You can fill the entire sheet, outline or pattern. This we use technology, if needed draw something fluffy or prickly.
For example, we draw on topics: "My Favorite Pets", "Herringbone fluffy, elegant", "Cheerful snowman"
Very interesting paint with leaf prints. Walking with children in the kindergarten, we collect leaves from different trees that differ in shape, size and color.
We cover the leaves with paint, then put the painted side on a sheet of paper, press and remove, we get a neat color print of the plant.
Here are the drawings we got.
Drawing watercolor on a candle or on wax crayons
It will take: wax crayons or a candle, thick white paper, watercolor, brushes.
Image Acquisition Method: the child draws with a candle "on paper. Then he paints the sheet with watercolor in one or more colors. The candle drawing remains white.
From the older group we learn draw technique"Monotype".
It, in turn, is divided into 2 types. Object monotype and landscape monotype. Subject monotype, as a rule, begins to be used with children of the older group. We fold a sheet of paper in half and draw half of the depicted object on one half of it. Then fold the sheet in half again.
In this technique We mainly draw symmetrical objects. Interesting work was done on the following Topics: "Wonderful Butterflies", "Magic Tree", "Wonderful Bouquet".
In the preparatory group, children are already introduced to more complex technique
landscape monotype.
The child folds a sheet of paper in half. On one half of it, a landscape is drawn, on the other, its reflection in a lake, river (imprint). The landscape is done quickly so that the paint does not have time to dry. Half of the sheet intended for printing is wiped with a damp sponge. The original drawing, after it has been imprinted, is enlivened with colors so that it differs more from the print.
Blotography.
It is to teach children to make blots (black and multi-colored). It will take: liquid paint (watercolor or gouache, brush, white paper.
Methodology drawing: the child, having collected paint on a brush, drips from a certain height into the middle of the sheet, then tilts the paper in different directions or blows on the resulting drop. Fantasy will then tell you who the resulting blot looked like.
After that, without forcing the child, but showing, we recommend moving on to the next step - circling or drawing ink blot. The result can be a whole story.
One of the varieties of blotography is tube blotography.
The child scoops up the gouache with a plastic spoon and pours it onto the sheet, making a small spot (droplet). Then this spot is blown from a tube so that its end does not touch either the spot or the paper. If necessary, the procedure is repeated. Missing details being completed.
Another interesting technique Nitkography
It will take: thread, brush, bowl, gouache paints, white paper.
The child lowers the thread into the paint, wringing it out. Then, on one half of a double-folded sheet of paper, he lays out an image from the thread, leaving one end of it free. After that, he puts another sheet on top, presses it, holding it with his hand, and pulls the thread by the tip.
When the sheet is opened, there is some kind of image that can be finish drawing to the desired image.
Technique"Splatter"
The child picks up paint on the brush and hits the brush on the cardboard, which he holds above the paper. The paint splatters on the paper.
« Drawing comb and toothbrush"
Thanks to stiff, thick, evenly spaced bristles, it allows you to quickly and easily tint paper or apply elements of a picture with different ink density.
The brush cannot be wetted too much, that is, we dip a semi-dry toothbrush in gouache, the consistency of gruel and you can get to work.
Technique"Colored scratch"
The child rubs the leaf with a candle so that it is completely covered with a layer of wax. Then the sheet is painted over with gouache mixed with liquid soap.
After drying, the drawing is scratched with a stick. Further possible drawing missing details in gouache.
cabbage leaf drawing.
The child covers a cabbage leaf with paints of different colors, then puts it on the paper with the painted side to get a print.
Each time a new leaf is taken. Missing details are finished with a brush.
Technique"frottage"
It is rightly said that everything new is the forgotten old. I remember how, as a child, they put coins under a sheet of paper, and then shaded the paper in this place, getting quite decent "money" for playing in the store.
frottage -means- "rub". The child covers the stencil or embossed picture with a blank sheet of paper, and shades the paper in this place with a pencil. Missing details being completed.
Plasticineography
interesting technique, is plasticineography. That is, drawing with plasticine. For preschool children, this technique working with plasticine may seem difficult, this is due to insufficient development of the musculoskeletal tissue, as well as the inability to concentrate and be assiduous for a long time. Therefore, to involve in this technique better than children of the preparatory group.
As a variant of plastinography, the idea of coloring black and white pictures using plasticine. Any drawing or contour from the coloring is taken as a basis, and instead of felt-tip pens and pencils, the child uses plasticine of the desired colors. As a result, the picture is very original and embossed. This leads the children to an indescribable delight.
And in conclusion, I would like to tell: ways and techniques there is still a lot of unconventional drawing, but when choosing one or the other drawing techniques First of all, it is necessary to take into account the age and individual characteristics of children. Of course, of those present here, not only teachers of preschool education, but each of you has children and grandchildren. And I hope that my presentation will be useful to you not only as teachers, but as mothers and grandmothers.
I wish you success. Thank you for your attention.
slide 1
slide 2
 Non-traditional visual techniques are an effective means of depiction, including new artistic and expressive techniques for creating an artistic image, composition and color, which make it possible to ensure the greatest expressiveness of the image in creative work so that children do not create a template. *
slide 3
 Hand drawing Age: from two years. Expressive means: spot, color, fantastic silhouette. Materials: wide saucers with gouache, brush, thick paper of any color, large format sheets, napkins. Method of obtaining an image: the child dips his hand (the whole brush) into gouache or paints it with a brush (from the age of five) and makes an imprint on paper. They draw with both right and left hands, painted in different colors. After work, the hands are wiped with a napkin, then the gouache is easily washed off. *
slide 4
 Finger painting Age: from two years. Expressive means: spot, dot, short line, color. Materials: bowls with gouache, thick paper of any color, small sheets, napkins. Method of obtaining an image: the child dips his finger into gouache and puts dots, spots on paper. Each finger is filled with a different color of paint. After work, the fingers are wiped with a napkin, then the gouache is easily washed off. *
slide 5
 Foam rubber impression Age: from four years. Expressive means: spot, texture, color. Materials: a bowl or a plastic box, which contains a stamp pad made of thin foam rubber soaked in gouache, thick paper of any color and size, pieces of foam rubber. Method of obtaining an image: the child presses the foam rubber to the ink pad and makes an impression on the paper. To change the color, another bowl and foam rubber are taken. *
slide 6
 Crumpled paper print Age: from four years. Expressive means: spot, texture, color. Materials: a saucer or a plastic box containing an ink pad made of thin gouache-impregnated foam rubber, thick paper of any color and size, crumpled paper. Method of obtaining an image: the child presses the crumpled paper to the ink pad and makes an impression on the paper. To get a different color, both the saucer and the crumpled paper change. *
Slide 7
 Leaf prints Age: from five years. Expressive means: texture, color. Materials: paper, leaves of different trees (preferably fallen), gouache, brushes. Method of obtaining an image: the child covers a piece of wood with paints of different colors, then applies it to the paper with the colored side to obtain a print. Each time a new leaf is taken. The petioles of the leaves can be painted with a brush. *
Slide 8
 Wax pencils + watercolor Age: from four years. Expressive means: color, line, spot, texture. Materials: wax pencils, thick white paper, watercolor, brushes. Method of obtaining the image: the child draws with wax pencils on white paper. Then he paints the sheet with watercolor in one or more colors. Drawing with wax pencils remains unpainted. *
Slide 9
 Monotype subject Age: from five years. Means of expressiveness: spot, color, symmetry. Materials: thick paper of any color, brushes, gouache or watercolor. Method for obtaining an image: the child folds a sheet of paper in half and draws half of the depicted object on one half of it (objects are chosen symmetrical). After drawing each part of the subject, until the paint has dried, the sheet is again folded in half to obtain a print. The image can then be decorated by also folding the sheet after drawing a few decorations. *
slide 10
 *
*
slide 11
 *
*
slide 12
 Non-traditional drawing techniques in different age groups of the kindergarten Younger group (2-4 years old) drawing with a hard semi-dry brush with a finger drawing with the palm of your hand drawing with a cotton swab with potato seals cork print Middle group (4-5 years) foam rubber print print with eraser, leaves wax crayons + watercolor candle + watercolor drawing with crumpled paper subject monotype Senior and preparatory group (5-7 years old) landscape monotype drawing with a toothbrush combing paint spatter air felt-tip pens blotting with a straw photocopy - drawing with a candle scratching black and white, color drawing with threads drawing with salt, drawing with sand *
slide 13
 Recommendations for teachers Use different forms of artistic activity: collective creativity, independent and play activities of children in mastering non-traditional image techniques; in planning classes for visual activities, observe the system and continuity of the use of non-traditional visual techniques, taking into account the age and individual abilities of children; improve your professional level and skills through familiarization and mastery of new non-traditional ways and techniques of image. *
slide 14
 Recommendations to parents materials (pencils, paints, brushes, felt-tip pens, wax pencils, etc.) must be placed in the child's field of vision so that he has a desire to create; introduce him to the surrounding world of things, animate and inanimate nature, objects of fine art, offer to draw everything that the child likes to talk about, and talk with him about everything that he likes to draw; do not criticize the child and do not rush, on the contrary, from time to time encourage the child to draw; praise your child, help him, trust him, because your child is individual! *
slide 15
 List of literature used 1. http://luntiki.ru/blog/draw/956.html 2. http://festival.1september.ru/articles/556722/ 3. http://tfile.org/books/57128/ details/ 4. http://stranamasterov.ru/node/110661 5. http://ds205.a42.ru/parentalskaya-stranichka/sovetuyut-speczialistyi/teremok.html 6. http://festival.1september.ru/ articles/313479/ 7. http://img.mama.ru/uploads/static/images/ 8. http://stranamasterov.ru/files/imagecache/ 9. http://viki.rdf.ru/media/ upload/preview/klyaksa.jpg&imgrefurl 9. http://stranamasterov.ru/files/imagecache/orig_with_logo/ 10. http://festival.1september.ru/articles/574212/ 11. http://mama.ru/post /authorposts/id/414093 12. Davydova, G.N. Non-traditional drawing techniques in kindergarten. Part I. -M.: Scriptorium, 2003. - 80s. *
slide 16