lg lcd monitor does not turn on. Computer turns on but monitor does not work
With swollen capacitors 470 uF at 35 V - 3 pcs. Monitor when turned on, flashes the inscription LG, and turns off and so on, ad infinitum. We check the fuse, if we look further.
Schematic diagram of TFT monitor LG FLATRON W1942S
On the other side of the board, the smd capacitor often burns out, which is in the piping of the microcircuit, marking C303, is in parallel with the same C302. As a rule, capacitor C303 burns out along with the transistor APN 4052. Apparently, this is the weak link in LG w1942s.
Firmware after power surge
As a rule, after a power surge, the firmware of the LCD monitor LG 1942 and 1742 also flies. So after replacing defective items, it may be necessary to reflash monitor.
LG flatron w1942s when turned on, the backlight lights up for 2-3 seconds and goes out
Inspection showed 3 swollen electrolytes at 470 microfarads at 35 volts, which were replaced with new ones, instead of with 1000 microfarads x 16 V for prevention. The first inclusion showed that after replacing the capacitors, the backlight does not light up even for a second, but power indicator glows blue, but the screen remains dark. Diagnosis burned out mosfet 4525GEH, it can be replaced by an analog STU407D.
Attention! It is impossible to turn on the monitor after replacing swollen capacitors for powering the inverter, without first ringing the output transistors.
We do not recommend buying cheap Chinese capacitors (Extra E-C class), their ESR is overestimated by 1.5 - 2 times. It will work, but it is fraught with heating of the capacitor and transistor of the pulse converter. We put capacitors of a normal brand: Jamicon, Suntan, Samwha or Yageo.
The transistor piping, according to the inverter circuit for backlighting the monitor, was not affected, all the details turned out to be working. It remains to purchase APM4048DU4 body TO252-4 or equivalent STU407D, АР4525GEH, IRF7389, IRF7319PBF (less current). Put STU407D, since the current characteristics are almost 2 times better.
After replacing the elements, it is still necessary to check the temperature of the transistors and the temperature of the capacitors every minute in the first 10 minutes. If not hot, then check the temperature every 5 minutes.
LG W1942S backlights do not turn on - APM4048DU4 is to blame
If the repair did not end with soldering capacitors, and LG flatron W1942S apparently there is no protection operation after the leakage of capacitors (they must be changed in advance), then everything can be more complicated. Short circuit of the transformer in the inverter or unsoldered legs of the transformer in the transformer itself, then look for the query " monitor backlight inverter circuit«.

Today I will talk about what to do if computer turns on but monitor does not work. Actually, a couple of days ago, looking at the night, I thought: “What a wonderful monitor I have, it is almost six years old, and it has never broken down.” In the morning the monitor did not turn on 🙁
Those. The power indicator on the monitor didn't even turn on.. Naturally, the first thing I did was check the power cable by connecting the monitor with a different cable. Alas, this did not work - the monitor showed no signs of power. Taking a screwdriver in hand, I unscrewed a couple of screws on the back cover of the monitor, and, just in case, reconnected it to the power supply ... The monitor started working! However, he again refused to turn on the next morning.
In principle, there are two versions of the fact that the monitor monitor turns on every other time:
- Bad contact inside the monitor;
- The problem with the electrolytic capacitors of the monitor power supply.
Actually, I had to disassemble the monitor, namely the LG Flatron L1917S (do not pay much attention to the brand and model of the monitor, because similar malfunctions happen with different monitors). Having unscrewed five screws on the back cover, I carefully began to “unfasten” the case latches. I found a recommendation on the Internet that it is convenient to use a plastic card for this, so as not to damage the monitor case. Since I did not dare to use my Sberbank card, I used a screwdriver.
Actually, inside modern LCD monitors, there are not so many draft boards, so it’s not difficult to detect a rogue with a power supply, because. it has a connector for connecting the power cable.

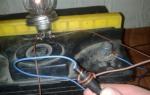
It took a couple of seconds to identify the cause of the malfunction, so it was clearly visible that one of the electrolytic capacitors (1000 microfarads x 16 V) of the monitor's power supply was swollen.

The slightest swelling of an electrolytic capacitor, as a rule, leads to the fact that its capacity decreases sharply, which leads to increased ripple of the rectified voltage. Since modern computer technology is very sensitive to deviations in the power supply, it simply does not turn on. Thus, protection is triggered, which prevents more serious damage.
Conclusion: any swollen electrolytic capacitor must be replaced, whether it is a monitor power supply, or, for example, a computer motherboard.
When replacing capacitors, it is necessary to install a capacitor whose capacitance and voltage are not less than that of the "native". You can not pay much attention to the manufacturer. I found a suitable capacitor in a faulty power supply from the system unit. In the photo below, the “native” SAMXON capacitor, on top, the HEC capacitor. The capacitance and voltage of both capacitors are the same.

Below is the "native" capacitor. Capacitance and voltage of both capacitors are the same
Well, actually, after soldering the capacitor, it remains only to assemble the monitor. It is desirable that after assembly, there are no “extra” screws left 🙂
Evgeny Mukhutdinov
Not so long ago I solved the problem when the computer monitor did not work. Troubleshooting is not a pleasant pleasure, so I decided to write an article about the most common problems that may arise in this situation. Therefore, our conversation will focus on why the monitor does not turn on when the computer is turned on. As usual, I will talk about several ways to remedy the situation, among which I hope you will find the one that will help you.
First you need to make sure that the monitor is not working for you. Turn off the computer by pressing the "Power" button and hold it until the noise stops coming from the system unit (usually in older computers). After a complete shutdown, turn on the computer again, if the system unit makes noises or any indicators flash on it, indicating that the computer has turned on, and nothing is shown on the monitor, then we read the article further.
Important manipulations
Before you start reading the article, make sure that the surge protector is enabled. If there is no power, then you will never see any image on the screen. It is possible that someone in the household turned off the monitor through the button, or maybe you did it yourself on purpose. Check if everything is ok with it.
So, what should be done first when the monitor does not turn on when starting the computer? Some monitors, like system units, have a power button. Usually it is located behind the monitor, sometimes it is found on the side. To turn on the monitor, it is necessary to switch to the “On” (1) position, for clarity, look at the image below:
To determine if the monitor is turned on, look at the front of the monitor. Below are usually indicators by which you can determine whether voltage is supplied to the monitor.
The very first common problem is bad contacts. Moreover, this nonsense can be, as in the place where the wires are connected to the motherboard, behind the system unit, there is also poor contact between the video card and the motherboard, and the most banal thing is when there is poor contact at the back of the monitor. In general, it is necessary to check both ends of the wires, namely the wire that transmits the image to the screen and the power wire from the mains.
There may be another pitfall here, the type of signal transmitted to the monitor. Modern video cards have two built-in connectors through which it is possible to connect a monitor: white (DVI) and blue (VGA). The latest type of connector that can be found in the newest monitors is HDMI and it's hard to make a mistake when connecting with it.

If you have a DVI connection, try changing it to blue and vice versa. Did not help? Then find the monitor connector on the motherboard itself.
It will be there in the case when the above board has an integrated video adapter. Connected? Working? Then the matter is in the video card, namely in the settings, or the worst thing is that it burned out for you. You can also connect another monitor by disconnecting it from another computer, you can borrow it from your neighbors for a couple of minutes if you don’t have a second home computer. When turning on another monitor, turn off the computer, unplug your monitor and plug in another one, and then turn on the computer.
Monitor settings
If everything is connected correctly, and you have no idea why the monitor does not turn on when you turn on the computer, then you must not exclude that the settings for the monitor have been changed. Press the "Menu" button on the monitor and go through the settings. It is necessary to change the brightness and contrast. If you do not know how this is done in your monitor, then find the user manual. When buying a monitor, you should have been given a disc or a printed manual. If for some reason it is not there, then the Internet will help you to search.

For those who are not afraid to dig deeper into the settings, you can do it without any disks and documents. In fact, everything is clear there. To make this task easier, first switch to "Russian language".

After that it will be more or less clear. By the way, if you see the settings menu on the screen, then everything is in order with your monitor. You don't have to worry about replacing it.
Non-working motherboard
The next failure option is a partial failure of the motherboard. In this case, the computer may turn on and even boot, but the monitor will not show a picture. To check this manually, we will have to open the system unit and carefully examine the motherboard.
It must not be ruled out that the connector on the motherboard where you connect the video card could be damaged. To check this, you will need to install another video card and try to send an image to the monitor from it.
If everything rests on the motherboard - it is not working, then you will have to call a specialist at home, since the problem may not lie in the computer screen.
Monitor burnt out
If it is the monitor that does not work, you can try to disassemble it. However, it is highly not recommended to engage in this unknowing people, it is better to take it to a service or buy a new one. It just so happened that monitors are rarely repaired by ordinary users, the process is too complicated.
On this occasion, I have a story, when I was in college at a programming lesson, smoke went up behind the monitor. At that time, I was inexperienced and immediately ran after the teacher to report this "joyful" event. He was sitting in another office, when he flew in with such news, he asked - and you disconnected him from the power supply. The answer is nope. Then a mime formed on his face, which he saw a couple of seconds ago on me. When we entered the office, the smoke was almost gone, and the classmate who was sitting next to him turned it off. The teacher smiles for a couple of seconds and says - Well, go sit down for another one 😉 . The whole group laughed.
I think this story will be instructive for you. If smoke comes out of any device, then you must immediately de-energize it so as not to burn down the apartment or office!

Dust in the system unit
How long have you been carrying out preventive maintenance in your system unit? If the window of the room where the computer is located is opposite the roadway, then in the summer you probably noticed a lot of dust on the windowsills. So, the system unit is a vacuum cleaner that swallows this dust into itself. Open the cover of the system unit and go through the vacuum cleaner.
Important! Do not touch the motherboard and other devices with a vacuum cleaner. After collecting the debris, disconnect the graphics card from the motherboard and clean the contacts with a pencil eraser. With a light touch, go through the contacts of the video card. No need clean with pen eraser as it contains solid particles.
Below in the image you can see how it looks, only instead of a video card in the picture of RAM:

In one of my articles, I talked about a video card, many novice users will need this information, follow the link to read it: "".
Software
If you recently did a driver update and Windows does not load, then you need to uninstall the installed software. This is usually due to an incorrectly installed driver.
To bring your computer back to life, go into safe mode and do a system restore. If you know for sure that you installed or updated video card drivers, then you need to remove them from your system.
I wrote about entering safe mode for different systems in 3 of my articles:
BIOS
If your computer has 2 video cards, that is, one is integrated into the motherboard and the other is external, then the problem may be that the device is incorrectly selected in the BIOS. You ask why the computer does not automatically determine which
To reset the settings in the BIOS - e, thereby making them Default (default), just disconnect the battery in the motherboard. You can read more about this in my article: "".
Other problems
It is possible that the cable contacts may oxidize a little. To fix the problem, take rubbing alcohol and wipe both ends of the cable. In no case do not put pressure on the pins, so as not to bend or even break them. If it breaks, you will have to buy a new cable. By the way, gold-plated contacts are better in this regard, namely, they are more resistant to oxidation. If the pins are bent, then you need to carefully align them. To do this, use, for example, a thick needle or a narrow screwdriver.
Monitor does not turn on (repair):
To wonder why the monitor does not turn on, users do not have to do it too often. But, if the problem has already arisen, it can be quite difficult to deal with it.
And in such a situation, when the computer is left without the main means for displaying information, as many actions as possible should be taken to restore it.
And this can help to study the signs that accompany a device that does not turn on - a flashing light, a system reboot, and even the behavior of the computer itself.
The check will help to find out what kind of problem arose, and help to fix it on your own or by contacting the service.
Hardware failures
Despite the fact that it seems to the user that it is the monitor that does not work, and everything is in order with the system unit, most often the problem is in the computer.
In this case, even after handing over the device for repair, you can get an answer that it works quite normally.
And buying a new monitor will generally lead to a waste of money.
So, the main reasons that nothing is displayed on the display after pressing the power button may be:
- Video card problems, with the help of which the system unit and the monitor are connected;
- Motherboard not working properly.
- And finally, another hardware problem - actually a broken monitor.
In each of these cases, it is quite difficult to determine the cause of the malfunction when starting the computer - especially for a not very experienced user who does not encounter such situations.
And yet, there are several techniques that can help not only to check what the problem is, but also the degree of its complexity.
As a result, you can determine what is required to resolve the issue - is it worth trying to do it on your own or you can’t do without a service.
Computer malfunctions
A fairly common reason for the absence of an image on the monitor is a computer that has not turned on for any reason.
This happens, for example, when the power supply of the system unit is out of order or its power is not enough to support the performance of all systems connected to it (including video cards).
It is worth noting that modern gaming graphics cards have a power consumption of 150-180 watts, and AMD processors - up to 70 watts.
And when trying to start a PC with a 300-watt power supply (given the need for power consumption from the motherboard, hard drive and optical drive), the user overloads the system, and the computer does not turn on.
Although the same PSU is perfect for a nettop with a conventional integrated graphics card.

A problem with the main power supply is detected by the inscription on the monitor that lights up before it is turned on, and it disappears in just a couple of seconds.
It is solved by replacing this element - a fairly simple procedure that takes several minutes and a new PSU.
If the PC still works, but when you turn on the computer, the built-in speaker betrays a signal in the form of a squeak, the memory is faulty.
Advice! After cleaning the contacts or, in rare cases, RAM stick replacement(for such a radical solution, it is worth doing additional tests), the problem is usually fixed.
You can find out that it is the motherboard that is faulty in the same way as with a faulty power supply - the computer simply does not turn on, and the indicator on the monitor continues to burn.
Although to clarify the reasons, most likely, you will have to contact the service. But you should not give the monitor there, but the system unit.
Additionally, you can make sure that the fault in the absence of a signal from the monitor lies with the computer, and not with the device that does not turn on, by connecting the monitor to a laptop, second computer or video player.
This test option is ideal in case of a faulty system unit or an incorrectly configured system.
Since both the player and another PC will work fine with it, and the problem will have to be solved with the computer itself.
video card
If the user has recently disassembled the computer and moved some modules on the motherboard, it is possible that the problem with the monitor is actually in the graphics card.
A video card shifted when cleaning the computer from dust may not work and the monitor, accordingly, will not turn on.
To check the board, you will have to disassemble the system unit back.
The absence of a result does not necessarily mean that the video card is not related to the problem.
You can additionally check it by switching the connecting cable from the monitor to the connector of the second graphics card - modern PCs, especially gaming ones, have two of them - built-in and discrete.
A normally working display indicates the need to change the video card or temporarily use the second one.

If you have two video cards, the problem occurs when the drivers of these devices conflict. Disabling the integrated graphics card in the BIOS will help to eliminate it.
Monitor
When the button blinks but the monitor does not work, it can be assumed that the cause is in the computer. If the indicator does not light up at all, the point is in the display.
In extreme cases, even the matrix may be broken. But most of the time it's a food problem.
You can find out if a problem with the cord is the cause of the breakdown after checking its connection to the mains. It is recommended to test the monitor with another cable.
If the lamp still does not light up, the power supply is faulty, which should be replaced.

Another common cause, which is already characterized by a burning light bulb, is the lack of communication between the monitor and the computer.
In this case, the processor is working normally (there are no signals, the power supply fan is working), and the indicator indicates that power is being supplied to the display, but there is still no image.
The connecting cable should be switched to another video card and returned again.
Software malfunctions
If the problem is not with the hardware, but with the computer, fixing it is much easier. You do not have to contact either the service or the warranty workshop.
All that is required from the user is to reconfigure the system or update drivers.
Monitor settings
The reason why the display does not work may be the picture settings that have been knocked down. For example, incorrectly set frequency or screen resolution.
You can identify the problem by trying to connect the monitor to another computer, and get rid of it by resetting the settings after logging in through safe mode, which may require another display.

Drivers
Incorrectly installed drivers also lead to a lack of image.
Although at the same time the monitor will turn on for a while and show at least the boot screen of the operating system.
They deal with the problem by going to work in safe mode and updating the drivers.

Operating system
Displaying BIOS loading when you turn on the computer, and the image disappears further, can be caused by serious problems with the operating system.
This situation is caused by viruses that got on the PC from the Internet or from removable media, and other malfunctions in the operation of system files.
If safe mode or restoring a previous working state of the system does not help, the OS is reinstalled again.
It will take no more than 20-30 minutes of time, and the monitor's performance will be restored automatically.
Although, to get some extensions, you still have to install new drivers.

Monitor not working when computer is turned on
Why can't the monitor turn on? - Common causes
The computer turns on, but there is no image on the monitor! Computer repair. Black screen
The computer turns on, all coolers spin, LEDs and indicators light up, but there is no image on the monitor. There is no image not from the video card, not from the motherboard. The problem turned out to be a corrupted RAM stick.