What is the LED in the flashlight 5000w. Characteristics of LEDs for flashlights
It's one thing if you occasionally need to organize additional lighting in the basement or pantry, and quite another - the constant use of a lantern in extreme conditions of the wild. In the first case, almost any non-branded flashlight will do: you can rely on your own intuition. However, if you plan to use the device for a long time, try not to purchase the cheapest options.
If your professional activity or favorite hobby is connected with military or search operations, buy only flashlights of famous brands. Nothing is as expensive as a good name: manufacturers value their brand and maintain its reputation by constantly introducing technical improvements to the models.
When choosing a mobile lighting device, you need to take into account a number of different factors, for example, such as the material of the case, power sources, however, LEDs remain the heart of a modern flashlight - semiconductors that are capable of emitting a bright optical glow if an electric current is passed through them in the forward direction. Types of LEDs and their characteristics - this is what you need to put in the first place when choosing a flashlight.
It is hard to imagine that such an important practical invention as light-emitting diodes was used for a long time only as a light indication. The first LED was patented in 1927 by O. V. Losev, however, wide practical use was frozen for a long time due to the poor level of development of semiconductor technologies. At this stage, modern manufacturers use a variety of types of LEDs for flashlights. How to deal with them?
Subtleties of choice: modern types of LEDs and their characteristics
In 95% of new flashlight models, Cree LEDs are used, which are available in different series. In a short time, this enterprising manufacturer practically survived all competitors from the market.
The main difference between LEDs is tied to the maximum brightness of the glow and size. Of all the diversity offered, the following main series should be singled out separately:
- XP-E and XP-E2 have standard dimensions of 3.5x3.5 mm, rated for 1A current and 3.5W power. As a rule, they are used in key chains and small models.
- XP-G, XP-G2 with similar dimensions of the diode, the power is 4.9 W, the current strength is 1.5 A, the brightness is up to 490 lm. Used in small lanterns, like the previous series.
- XM-L and XM-L2 with dimensions of 5x5 mm provide 10 W of power, 3A of current and 1040 lumens of brightness. Such diodes in the amount of one or more pieces are used in medium and large lanterns.
LEDs, which are additionally marked with the number 2, are distinguished by the fact that they give out brightness 10-20% higher.
Recently, Nichia 219 LEDs are also gaining popularity, which have almost made a breakthrough. They differ from Cree in better color reproduction, which is pleasing to the eye.
Important light parameter: brightness bin or light temperature
Types of LEDs for flashlights have different glow temperatures. Be careful: the most comfortable glow spectrum is selected individually, and reputable manufacturers can produce one model with different LED options in different shades.
Manufacturers divide them into main groups that are quite easy to distinguish thanks to the standard marking:
- Warm White - warm colors. Such LEDs are more expensive, as they give less distortion of natural colors.
- Neutral White - neutral. They are the golden mean. Like LEDs with a warm spectrum, they are optimally suited for domestic purposes.
- Cool White - cold. As a rule, they are mounted in more budget models, they somewhat distort natural colors due to a bluish tint, however, compared to warm ones, they provide higher brightness. Used in powerful tactical and search lights.
LED drivers: current stabilization
In all high-quality models, the LED is not powered directly from batteries, but through a stabilizing device - a driver. In addition to saving battery power, the presence of this component provides a number of such important additional functions as the possibility of stepwise regulation of the brightness of the glow, flashing mode, temperature control, battery discharge, operating modes.
When choosing the optimal types of LEDs for flashlights, it should be remembered that the larger the area of the LED, the easier it is to create a wide beam with it and vice versa. The more lumens the flashlight emits, the brighter the beam of light and the shorter the battery life.
As a rule, when the thought of buying a flashlight comes - whether it be out of necessity or "just in case" - few people realize that the modern flashlight is no longer the same as it was before. Therefore, in the minds of most people, a flashlight is still just a tube with a weak bulb and batteries that do not last long.
Lantern in a person's daily life
In fact, lighting fixtures have changed a lot. Technological progress in this area is proceeding by leaps and bounds, and over the past few years a large number of models have been released that are radically superior to their predecessors. Many features have appeared that determine the reason why this flashlight is better in some conditions, and another one in others. Let's take a closer look at what a modern lantern is, and what you should pay attention to when choosing.
I. Purpose and methods of using lamps
This "baby" will be almost invisible on a bunch of keys, but if necessary, it will be able to illuminate the area for several tens of meters.
Initially, you need to understand for what purpose a flashlight is being bought. Hardly just to "see in the dark"! What do you need a flashlight for: for work, for home, for search and rescue operations, hiking, scuba diving, hunting, or exploring all sorts of secluded and dark corners, like mountain caves or the bowels of a city sewer? Depending on the purpose of the flashlight, you can determine which of its functions are really needed, and which will only result in additional financial costs or a useless increase in weight and dimensions. For example, as a flashlight for a dacha or at home, the simplest sample is quite enough - not even necessarily an LED one, but even on an incandescent lamp, powered by D-size alkaline batteries, because large dimensions and weight (within reasonable limits) are not in this case a decisive or even significant factor. For tourism, the best option would be a multi-mode LED flashlight on modern lithium batteries / batteries, since not only brightness is important here, but also the minimum mass of batteries that you have to carry with you. If you need to free both hands, a flashlight with a head mount will come in handy. Let's look at the main features of all types of modern flashlights from the standpoint of an ordinary consumer, types of led lights and the benefits of each. As an example, flashlights manufactured by Olight will be presented.
Flashlight-keychain, or "keychain", as the name implies, is attached to a bunch of keys. Such a flashlight is intended for use at ultra-close distances - for example, to shine under your feet or find a keyhole in the dark. For these purposes, one mode of operation with a glow intensity of 3-5 lumens is quite enough (this, of course, does not mean that it cannot be brighter). For such flashlights, the main requirements are lightness and compactness, so a simple 5 mm LED and lithium batteries in the form of thin disks (the so-called “tablets”) are usually used here, and the body of the flashlight itself is made of plastic. Recently, products of the traditional cylindrical shape have become a good alternative to such flashlights, but they are very small and light, using AAA batteries / accumulators (colloquially, “little fingers”) for operation. The body of such flashlights, like that of more "adult" counterparts, is made of aluminum with high hardness protective anodizing, less often - of polished stainless steel and titanium alloys. Often they have a modern powerful LED and several modes of operation, as well as full protection against moisture. The control of the operating modes of such lamps, as a rule, is carried out by rotating the “head”, and not by the button, since the latter significantly increases the dimensions of the lamp - and the “switch”, as a backup, “just in case”, lamp, is absolutely useless. An example of an excellent "key switch" is Olight i3S EOS (see).
The choice of a lantern is primarily determined by its future purpose.
EDC flashlights(every day carry- English. "everyday wear"- one of the most popular categories with a wide variety of choices. There are both the simplest cheap single-mode devices, as well as branded, expensive and multi-mode devices. As a rule, flashlights in this category are very compact, often equipped with a clip for attaching to a pocket or belt. Such lamps are used mainly in the city, their applications are very diverse, since they are already able to provide a fairly decent brightness of the light flux. Multi-mode lights are good because at the minimum brightness mode they are convenient to shine under your feet, and the maximum glow will be quite enough to illuminate the road several tens of meters ahead. The power of such flashlights varies on average from 3-10 lumens in the minimum mode, and the maximum brightness of the glow will depend on the batteries and LED used. Typically, such flashlights on a single finger battery give out a maximum of about 120-150 lumens - on lithium batteries, usually two or three, and sometimes four times more. In addition, such flashlights often additionally provide flashing modes - more precisely, the SOS mode (low frequency light pulses) and the strobe mode (high-frequency flashing - suitable, for example, for defensive blinding of an aggressive person, an angry dog or a tax inspector who suddenly appeared).
The most popular power supply for EDC flashlights is AA batteries / accumulators, sold on almost every corner; there are also options on lithium batteries / accumulators: CR123A, 16340, 14500, less often - on 18650 or two CR123A cells.

Compact EDC flashlights + "switch"
For EDC flashlights, the body material is usually high hardness anodized aluminum alloy. Thanks to this, the flashlight has a sufficient margin of safety for most conditions of use, and hard anodizing protects it well from scuffs and scratches. In addition to aluminum, stainless steel and titanium alloys are also used - however, the thermal conductivity of these materials is lower, therefore it is often better not to use such lamps at maximum modes. But the look of a polished "stainless steel" or titanium is very solid, and the latter is also almost as light as aluminum, although noticeably more expensive. The shape of the light spot for EDC use is desirable with a wide "hotspot" (central bright spot) - this way it will be much more convenient to highlight objects at close distances, for which such flashlights are intended.
A great example of EDC flashlights is Olight's Baton series: S10, S15 and S20 (see -).

Putting such a diffuser on the “head” of a hand lantern, you can get a good replacement for a camping one.
Tourist lanterns- also a popular type of lighting fixtures, in many respects similar to the previous one; but here the increased brightness is already very desirable - and also, and this is important, the increased capacity of the batteries. Lanterns for tourism must have several operating modes, thanks to which it will be possible to easily illuminate a forest path, a camping table, and the interior of a tent. For hiking or cycling, an important point to pay attention to is the balance between the energy intensity of the power source and its mass, so the best option for a tourist flashlight is to be powered by 2-3 disposable lithium AA batteries (alkaline AA is also possible, but lithium is lighter) - either from one high-quality 18650 battery with high capacity. The use of batteries of sizes D and C for hiking is very doubtful due to the poor ratio of "weight / energy intensity". Flashlights for 4-8 AA batteries or 2-3 18650 batteries, of course, can also be suitable for tourist purposes - but, as a rule, it is easier to take an additional power supply kit for a more modest flashlight. The light spot in tourist lanterns, as in EDC, is preferably wide - due to the increased power, such a flashlight will easily illuminate even fairly distant objects. Also, when choosing a tourist lantern, it will be useful to pay attention to security - especially moisture resistance. The protection of the flashlight is described according to the international specification IPxx, where the first of the digits "XX" indicates the level of protection against ingress of foreign objects (usually dust), and the second - the level of protection against moisture. Maximum protection corresponds to the IP68 index - this is ideal for a tourist lamp; however, IP67 will be quite enough, but less is already undesirable. For tourist-type flashlights, manufacturers produce a variety of accessories, thanks to which you can significantly expand the range of capabilities of your flashlight. For example, there are diffuser attachments that scatter light - thanks to which, instead of glowing with a narrow beam at close distances, the flashlight will illuminate the space around it like an ordinary light bulb or candle.

Universal (tourist) lights
An example of successful models of lanterns that can be safely used for tourism purposes:
- Olight ST25 ;
- Olight R20 and R40 - great for tourism, because it is equipped with a microUSB port for charging from external sources: a power bank, solar panels or a car cigarette lighter (see and).
Also, the Olight S20 of the Baton series is quite suitable for tourism (see).
Tactical / hunting lights designed specifically for use in combat conditions, most often in conjunction with weapons. There are flashlights designed for installation only on short-barreled weapons (pistols and revolvers), and there are options for long-barreled weapons (guns and rifles). Such flashlights are used to illuminate the target, as well as to blind and disorient the enemy.
When used for its intended purpose, a specialized tactical flashlight has to withstand considerable tests - this is recoil when fired, and various shocks, vibrations, etc.; therefore, such lanterns should have increased strength of the body and threaded connections, as well as a more reliable "stuffing". Cases of "tacticians" are made of aluminum alloys, less often - of steel and special composite materials. Incandescent lamps were used as light emitters, which have now almost completely given way to powerful LEDs. Modern LEDs produce a beam of light with a brightness of several hundred lumens, thanks to which it is possible to effectively illuminate targets at a distance of hundreds of meters. The "tactics" beam, as a rule, is very narrow - and this is done in order to avoid blinding the owner of the flashlight by the reflection of light from a close-range object falling into the light "cone". A tactical flashlight usually has a direct switch button - the flashlight starts to shine until the button is locked in the on position, so you can turn the flashlight on and off very quickly, as well as give a "blink" signal. In addition, a remote button for remote activation can be mounted on the “tactician”, which allows you to quickly control the flashlight mounted on the weapon: thanks to the presence of such a button, the shooter is not distracted from observing the target.
Tactical flashlights are often equipped with a steel bezel in the form of a toothed ring, thanks to which the flashlight can be used as a percussion tool - for example, to break window or car glass - as well as a shock-crushing weapon without the risk of damaging it.
Initially, tactical flashlights usually used a pair of relatively capacious, but rather expensive and disposable CR123A batteries, but thanks to the spread of 18650 batteries, the developers of “tacticians” began to use them as the main power supply. In the form of rare exceptions, there are tactical flashlights on AA and even AAA batteries.

Examples of great tactical flashlights from Olight: M18 Striker, M20SX-L2 Warrior, M21X-L2 Warrior, M22 Warrior, M3X Triton
(see 10–15).
search lights- as a rule, quite large and weighty, with a short glow time, but at the same time with a very high brightness. Basically, these are of two types: shining relatively close, but with a wide beam, and, conversely, long-range with a narrow beam of light (the effective range of illumination for the latter can reach a kilometer or more). To power the LED, either several 18650/26650/36650 batteries or special non-separable battery packs are usually used here. Usually such lights are used in professional activities - for example, rescuers, rangers or the military - so they meet the most stringent requirements for product reliability and security. Examples of such flashlights from Olight: SR Mini Intimidator, SR52 Intimidator, SR95S UT Intimidator, SR96 Intimidator, X6 Marauder (see 17–20, 23).

search lights

Browguard Olight H15S Wave interesting, first of all, by the ability to turn it on and off "without hands" - due to a special sensor system
Headlamps by analogy with telephone headsets, it is sometimes also called HandsFree, since the owner's hands remain free during operation. This type of flashlight is well suited for many areas of use - including as an auxiliary "melee" flashlight to the main "blaster".
One of the most important parameters of a headlamp is its weight, which is why such lamps are usually made of lightweight aluminum alloy, often combined with polymers or composite materials. There are, of course, headbands, and entirely made of plastic - but these are, as a rule, the cheapest models; such budget products, as a rule, have serious drawbacks - this is either too low brightness of the glow, or strong heating caused by the operation of a powerful light source (which cannot be avoided due to problems with cooling in the plastic case), as a result of which the flashlight quickly fails. The optimal power supply for a small and light headlamp is AA and AAA batteries / accumulators, as well as CR123A. If you need a flashlight more powerful or with a large supply of energy, then you will have to sacrifice the convenience of wearing, since the use of a 18650 or several AA batteries (less often AAA / CR123A) leads to an increase in the size and weight of the flashlight, and this makes its use less convenient. Nevertheless, the complex problem of user convenience and the availability of a large supply of energy is being solved - for this, headlamps with separate blocks are produced; The emitter of such a flashlight is traditionally mounted on the forehead, and the battery pack is located on the back of the head - thereby ensuring an even distribution of mass and comfort of working with the flashlight.
Typical headlamp output is 30-150 lumens. There are also models with a brightness of several hundred lumens or more - but they are already quite weighty (from 100 g without batteries - and even more with a separate battery pack). The shape of the headlamp beam can be different and is chosen for specific tasks: if it is necessary to shine mainly at close distances, then a wider beam is desirable (it is generally possible to use a uniform flood light), and if the flashlight is to be used instead of a manual one to illuminate medium and long distances, then this is where a narrow beam comes in handy.

Headlamps
Options for good headbands from Olight:
H15S Wave - powered by the original Li-Ion battery or 4xAAA, and due to the standard diffuser it can create both a narrow beam and a wide one (see 21);
H25 Wave - is powered by an external battery pack that can be put in a pocket / backpack or placed on a belt under clothes (which is especially important when using a flashlight in cold weather). Also, a feature of the flashlight is a contactless on/off switch and a “power bank” built into the battery pack, which will come in handy if necessary to recharge, for example, a mobile phone (see 22).

Underwater lights, or "diving", are used by swimmers when diving (diving) to a considerable depth during the day or at night, as well as when spearfishing. The main requirements for such lanterns are complete waterproofness and a sufficiently high brightness of the glow. The control in such flashlights is most often performed by a large lever / button or a magnetic ring, which makes it easy to turn on the flashlight and switch its operating modes even with scuba diving gloves. Power supply - capacious lithium batteries of sizes 18650, 26650, 36650, built-in batteries are also often used, and sometimes several AA batteries. It is important to remember that it is undesirable to use an underwater lamp - especially high power - in the maximum glow mode in air, since the design of such lamps is designed for normal cooling only in water; in the air, the underwater lamp can overheat and fail.

Zexus ZX-500: 300/150 lm, operating time 72 h/144 h, 3xD power supply, dimensions 100x180x85 mm, weight 420 g
As the name suggests, they are designed to illuminate a campsite or any other wide area. Most often, camping lanterns illuminate everything around them with a flood light - like a candle or a light bulb - but there are also options with a wide, but directional light. The main criterion when choosing a camping lantern in most cases is not the brightness of the glow, but the time of its operation on one set of batteries. It is also useful that such a flashlight has several modes of operation - including the SOS distress signal mode. In addition, for a camping lantern, as well as for a hand-held tourist, weight and size characteristics are extremely important - a lantern powered by 3-4 D-size batteries is unlikely to be comfortable to wear on a hike, but a lantern powered by 3-4 AA (AAA) batteries or one 18650 battery is quite . Powered by batteries D or C is suitable for a stationary use - or for caravanning. The body material of camping lanterns is usually plastic, metal is used less frequently. There are camping lights with built-in chargers - mechanical (you need to turn the knob, like old trucks) or solar-powered (in this case you need direct sunlight) - with which you can recharge a dead battery. Examples: Zexus ZX-500 (see).
Flashlights with adjustable focus (zoom), they are also "lens" - they are specially allocated to a separate category, since they are quite popular in the super-budget class, but due to the design features they are not the best option for purchase. The design of such flashlights is based on a scheme with a variable distance between the lens (usually aspherical) and the LED, thanks to which it is possible to obtain a beam in the form of a very wide light cone for short distances, as well as a very narrow and long-range beam (moreover, without side illumination). Such lamps have both advantages and disadvantages - and there are many of the latter. Designs with a movable "head" are usually poorly protected from moisture, dust and sand, moreover, the movable head with a lens can "loose" over time and cease to be fixed in the desired position. In turn, designs with a movable LED (moving inside a fixed housing) are bad in that over time, the wires between the control board and the diode break off in them; in addition, these flashlights usually have insufficient heat dissipation, which also does not add reliability to the flashlight. A significant disadvantage is also the fact that up to 50% of the light is lost at a long focus. Of course, there are branded lens lights, which are made much better than budget ones - however, they retain the fundamental features of variable focus. There are, of course, "lenses" and advantages - this is the flexibility of use; sometimes it is useful to be able to switch from a narrow beam, used to illuminate darkened spaces of great depth (like tunnels or wells), to a wide flood light, which is useful, for example, for economic activities at a halt.
II. Characteristics and indicators that determine the level of the flashlight

The most popular lens "superbudget"
There are a huge number of different flashlights on the market - and when there is a desire to buy a good flashlight for a specific purpose (or for all occasions), you ask yourself the question “Which one is good?” After all, I want the lantern to in no case fail when it comes to business. So, if you need to buy a really good flashlight, it must be branded. Well-known flashlight manufacturers value their image very much, therefore they usually bear full responsibility for their product, strictly observing warranty obligations and often even providing post-warranty service. In addition, branded flashlights usually have a huge variety of control options and operating modes, so using such flashlights is much more pleasant and comfortable. Non-branded flashlights bribe mainly with their price - however, at the same time, the buyer inevitably gets a pig in a poke. Using a flashlight of unknown origin can reveal a whole bunch of problems and shortcomings - these are poor-quality materials, and poor threading, and poor heat dissipation, and lack of moisture protection, and an unpleasant "cyanotic" glow spectrum, careless soldering of electronics, etc. In addition, indicators of the brightness of the glow and the beam range of non-branded flashlights, as a rule, is seriously overestimated - often at times, or even by orders of magnitude. Such "marketing" is intended, first of all, for ignorant buyers, who, in addition, have poor eyesight, so that the extra zeros assigned to the characteristics do not arouse suspicion. Non-branded products are riveted - no matter what Germany, Switzerland or America is on the labels - mainly in China. Actually, Chinese origin is no longer an unambiguous synonym for low quality - many serious American and European manufacturers have either been using components manufactured in the Middle Kingdom for quite a long time, or have completely transferred production to China; In addition, many Chinese companies have already achieved recognition of the high quality of their products in the world market - and flashlights are no exception. However, there is a fundamental difference between the products of a specialized factory equipped with the most modern equipment with strict quality control and staffed by well-trained and responsible personnel - and the products of some garage-basement workshop, whose workers received their technical education by disassembling stolen mopeds, and to stimulate the flight of thought designers only kaolyan moonshine is used. Nevertheless, the staff of the latest enterprises also need to feed their families - this is precisely what explains such an abundance in the sale of lanterns of unknown brands and origins, the quality of which “walks” not only from name to name, but even from copy to copy for products of the same name. It is clear that the acquisition of such a lantern is pure lottery. Hence the conclusion: if a flashlight is needed extremely rarely (for example, to go down to the cellar for potatoes or find a switchboard when the light suddenly went out), then perhaps a non-brand flashlight is enough - if only it was not the cheapest. If the flashlight is planned to be used for more or less serious matters - for example, hiking in places remote from civilization, exploring some abandoned corners, caving, diving, hunting, search and rescue or military operations, where the quality and reliability of the flashlight can depend on the life and health of the owner and people close to him, you only need to choose a branded product, it will more than pay for its price.
Type of light source - all about LEDs
Back in the 1920s, the Soviet physicist Oleg Losev, studying the phenomenon of electroluminescence, predicted the appearance of solid-state, that is, not requiring vacuum, and small-sized light sources with a very low (within 10 volts) supply voltage, and later received two copyright certificates for the device , which he called "light relay" - here what is an LED. However, the poor development of semiconductor technologies led to the fact that for a long time LEDs were used only as indicators - luminous dots of various colors. In recent years, there has been a real revolution in this area, which has led to the creation of super-bright LEDs. Before their appearance, the source of light for flashlights was incandescent bulbs, but now LEDs have replaced them almost completely. The fact is that lamps have very significant disadvantages compared to LEDs: this is, first of all, a short service life (especially in situations associated with extreme conditions, frequent vibrations, shocks), as well as low efficiency - with the same consumption of electric current the lamp shines much weaker than the LED. True, there are lamps and pluses; one of the most significant is the correct temperature spectrum - due to which the colors of objects illuminated by such a lamp, unlike LED lighting, are not distorted. Another plus of incandescent lamps is the absence of additional electronics, which could potentially fail and let the lamp owner down at the most inopportune moment; although, of course, in high-quality flashlights, the likelihood of this is minimized.
Types and varieties of LEDs
Manufacturers of LEDs, like any electronics, are constantly improving their products, so that on the flashlight market you can find different types of LEDs, which are quite difficult for a simple user to understand. The most popular LEDs of the American company Cree Inc.: XR-E, XP-E, XP-G, XM-L, as well as newer XP-E2, XP-G2, XM-L2 - these LEDs are most often placed in medium-sized lights ( except XM-L and XM-L2, which are very versatile and suitable for both compact EDC lights and powerful search engines). Cree MT-G2 and MK-R LEDs and Luminus SST-50, SST-90, SBT-70 and SBT-90 LEDs are typically used in large and powerful search lights powered by multiple batteries. In addition, LEDs differ in brightness bins - special codes for sorting LEDs by brightness. Cree LEDs have an alphanumeric designation; for XM-L(2) diodes the most common bins are T5, T6, U2, for XP-G(2) diodes - R4, R5, S2, for XP-E(2) diodes - Q5, R2, R3, for XR diodes -E - P4, Q3, Q5, R2.
Therefore, if the manufacturer or seller indicates that “the flashlight on the T6 diode” - he means the XM-L T6 diode.
types of LEDs for lamps, brightness
If you distribute the popular ones on a conventional brightness scale, as they increase, it will look like this: P4-Q3-Q5-R2-R4-R5-S2-T5-T6-U2.
One of the main differences between diodes from each other is their size, or rather, the area of the light-emitting crystal. The smaller the crystal area, the easier it is to focus its glow into a narrow beam - and vice versa. Therefore, the old XR-E LED is the easiest to focus, and a fairly large XM-L under the same conditions will shine much wider. If you need to get the narrowest possible beam from the XM-L LED, you will have to use a rather large, wide and deep reflector, which will negatively affect the weight and dimensions of the case. But with a small reflector on such an LED, you get a very successful pocket flashlight with a wide low beam.

Price-quality ratio
When choosing a flashlight, of course, you should read LED description and take into account the brightness of its glow. It is measured in lumens - the more lumens in the luminous flux of the flashlight, the brighter it shines and, accordingly, the faster it “eats up” the energy supply of the batteries. When comparing branded flashlights, you can more or less confidently start from the values of their glow brightness, declared by the manufacturers; however, not everything is always so perfect. Previously, some manufacturers were somewhat cunning when calculating lumens in their flashlights, often not taking into account light losses in the optical system at different temperature conditions, etc., as a result of which the declared characteristics turned out to be somewhat overestimated. Now, to equalize the characteristics of flashlights of different brands, a special single standard is used that defines methods for measuring brightness and range (ANSI FL1) - and if the characteristics were measured according to the ANSI standard, this will be indicated on the packaging. Often there is a kind of "military trick": some time after the start of work at maximum power, the brightness of the flashlight automatically decreases. This is called Step Down; such an algorithm of operation often serves only to provide the manufacturer with the opportunity to indicate the maximum possible brightness value on the package. However, in some cases, "stepdown" is really useful - thanks to it, the batteries do not sit down as quickly as they could, if the flashlight is constantly working at maximum. It also happens that a product with a more focused beam, but less brightness according to the ANSI standard, can beat a more powerful flashlight with a wider beam in terms of range - the optical system and the LED used already play a role here. In a word, branded flashlights can be safely selected and compared according to the brightness of the glow indicated by the manufacturer, if it was measured according to the ANSI standard - but it is also desirable to take into account the features of the flashlight's optical system, as well as the presence of a "stepdown" in some models.
Reflector / aspherical lens / TIR lens - all these devices are needed to focus the light emitted by the LED; in other words, they form a light beam.
Reflector is the best option. Thanks to him, a bright central spot and a noticeable side illumination are obtained. Such a structure of light is very convenient for orientation in the illuminated space - both at close and at long distances. In addition, the reflector can be smooth or textured (with an inner surface that looks like an orange peel). Due to the smooth reflector, the flashlight will shine further, so this option is useful for long-range flashlights, while the textured one has another advantage - thanks to it, the transition from the central spot to the side illumination is smoother, so this form of light is more convenient for close distances, which is important for EDC lights.
The aspherical lens in the flashlights with a variable focus creates light from a wide flood to a very narrow and fairly long-range beam. As described above, such flashlights are rather highly specialized and are not very convenient for comfortable use in various life situations.
A feature of the TIR lens (Total Internal Reflection - English “total internal reflection”) is that, unlike the reflector, the TIR lens collects all the light from the LED into one beam of a predetermined width, practically without side illumination. In this way, you can get a very narrow and long-range beam, which is necessary for search or tactical lamps, or, conversely, a very wide beam, well suited for tourist, headlamps or EDC lamps.
Application of LEDs
Often, when choosing a flashlight, the consumer wants the maximum range of glow from it - however, in most cases, long-range flashlights are not needed at all. Most often, the lantern is used to illuminate the surrounding area or objects located at a distance of no more than a few tens of meters. Long-range lanterns shine for a hundred meters and further - however, often with a very narrow beam, which poorly illuminates the surrounding space, especially at close distances. As a result, when illuminating distant objects with such a flashlight, the user will not be able to see what is in the immediate vicinity of him - figuratively speaking, under his feet. Of course, the flashlight can be periodically moved, moving it from side to side and up and down - but it is much easier in such cases to use a flashlight with a shorter range, but with a wide beam, which can perfectly illuminate everything that is needed at the same time. So, knowing it is quite obvious that long-range flashlights, indispensable for rescuers, hunters or the military, are not particularly useful in everyday use for domestic tasks.
The photo shows a comparison of the lighting tone, which is given by the LEDs of three different spectra: "warm", "neutral" and "cold". When choosing the light temperature of a flashlight, you need to focus on the following points: an LED with a warm glow spectrum minimally distorts the colors of the illuminated object, but has a lower brightness than a neutral spectrum LED - and even more “cold” LED. The latter is the opposite. Therefore, if you need a powerful search or tactical flashlight, where brightness is more important, then it is better to choose LEDs with a cold glow spectrum. If the flashlight is needed for everyday tasks, tourism, or for use as a headlamp, then the correct color rendering is still more important here - and, therefore, an LED with a warm glow spectrum will be more advantageous. Neutral LEDs are the golden mean both in terms of the truthfulness of color reproduction and the brightness of light.

Comparison of "warm", "neutral" and "cold" light. The former distorts colors less, the latter is more contrasting and powerful, "neutral" is the golden mean
An ordinary AA battery with a nominal voltage of 1.5 volts at a high current consumption will not be able to produce the required voltage and will “sag”, plus the voltage will quickly decrease as it is discharged - and therefore, the brightness of the flashlight on such a battery will also drop quickly . In order for the brightness not to decrease along with the discharge of the battery, modern flashlights are equipped with special electronic power stabilizers. A flashlight with such a stabilizer will maintain the brightness mode to the last; and when the battery voltage drops below a certain threshold level, the automation will simply switch the flashlight to a weaker mode - which the flashlight will also adhere to stably and stubbornly until the battery runs out completely.
Apart from the cheapest flashlights that have only an on / off button, most modern, even non-branded, flashlights have several modes of operation, including strobe (high-frequency flashing) and SOS (distress signal). Non-brand products usually have three (high power/medium power/strobe) or five (low power/medium power/high power/strobe/SOS) operating modes; while the average power usually corresponds to 50% of the maximum brightness of the glow, and the minimum - 10% (of course, it happens differently). In branded flashlights, everything is much more complicated. Here, the operation modes can be controlled by buttons (conventional mechanical or electronic), by rotating the “head”, by turning the magnetic ring, as well as by a combination of the above. Some flashlights "on board" have a variety of sensors to turn on / off or change modes - for example, a motion sensor that allows you to switch modes by lightly shaking the flashlight, or an infrared sensor that turns on / off the headlamp when you wave your hand in front of it without any pressing on buttons. In order to determine the preferences, it is best for the potential user to try the control in one way or another, since each of them has its own characteristics - which in practice can lead, for example, to the fact that you need both hands to control your flashlight. If this is not critical, then you can choose what you like best. There are also many operating modes for branded flashlights. Here it is worth mentioning the flashlights with the possibility of a smooth, stepless change in brightness or self-programming of operating modes. On the one hand, this is convenient because you can perfectly adjust the glow mode for a specific situation. On the other hand, knowing about the operating time from one set of batteries in each of the fixed modes, you can quite accurately calculate the required number of batteries that you should keep in reserve for a particular task - in flashlights with smooth adjustment, such calculations can be produce only in the mode of maximum or minimum brightness of the glow.

Ordinary aluminum reflector (reflector), TIR lens, aspherical lens (for flashlights with variable beam width)
The main (and best) material for the manufacture of modern high-power flashlights are aluminum alloys, the most important advantages of which are lightness, sufficient strength, excellent thermal conductivity and relative cheapness. Also, thanks to the protective anodizing, hard and wear-resistant, flashlights with an aluminum alloy body are quite difficult to scratch. Steel is also used in the manufacture of housings for flashlights, but much less often - since the flashlight becomes heavier, and the LED, due to the lower thermal conductivity of steel, cools much worse during operation, which can simply fail. However, if you do not need a high brightness of the glow, then the flashlight in a polished steel case will be a great fashion accessory. Quite often there are also flashlights made of titanium alloys (usually with a polished surface of the body, but sometimes matte). These lanterns are not inferior to steel either in strength or stylish appearance - but at the same time they are somewhat lighter, and also usually much more expensive. Plastic in the design of flashlights is used, as a rule, as an addition to aluminum - or for low-power flashlight housings, such as camping or simple headlamps.
Modern flashlights have a fairly durable, most often metal, case that protects the glass and electronics from external mechanical influences. However, even after purchasing a branded lantern, you should not thoughtlessly test it for strength by throwing it from the roof onto concrete - it is still not intended for this. If you choose a flashlight for maximum protection against shocks and vibrations, then it will definitely be a tactical flashlight designed to be mounted on a weapon and calmly withstand the dynamic loads that occur during a shot. High moisture protection level IPx7 / IPx8 - when the lantern can be safely dipped into water - is present in almost all branded lanterns, even quite budget ones. Exceptions tend to be budget flashlights, variable focus flashlights, camping flashlights, and some headlamps, which will only safely survive moderate rain.
Unlike 1.5V batteries, NiMh (Nickel Metal Hydride) batteries have a nominal voltage of 1.2V, so some flashlights may not work properly with them. However, high-quality NiMH batteries, unlike batteries, usually allow branded flashlights to shine at all of their lumens declared by the manufacturer.
Such a battery is often referred to as a "little finger" or "mini finger" battery. Flashlights on such a battery are very small and light - their weight can be only 10-30 g. The maximum brightness is about 60-80 lumens, which already allows you to shine well for a dozen or two meters; however, with such a brightness, AAA batteries will last for a short time, for 30-40 minutes - therefore, such flashlights are usually used as spares “just in case”.
"Finger" battery - the most popular type of batteries that can be bought almost on every corner. Its capacity is 2-2.5 times higher than that of the "little finger", so the lights on AA batteries will shine longer - and at a higher brightness (90-120 lm). Branded flashlights, when using high-quality batteries, give out about 140-160 lumens or more on a good NiMH battery. The dimensions of flashlights on AA batteries are noticeably larger than AAA flashlights - it’s not always possible to hang on a bunch of keys - but they still remain quite compact (weight - within 50-80 g, length - no more than 8-10 cm).

Size comparison of popular lithium batteries (from left to right): 10440 (AA), 15270 (CR2), RCR123A, 16340, 14500 (AA), 18650
Flashlights on two "little finger" batteries are quite rare - as a rule, these are branded lanterns made in the form of a stylish pen in multiple colors. Their brightness is usually 150-200 lumens - however, they do not work at such brightness for long. However, due to a very small reflector, such flashlights give a wide beam, very convenient for low-profile lighting.
In such flashlights, the batteries are installed sequentially one after another, resulting in a rather long (about 15 cm) and thin flashlight. Compared to a single battery, there is already twice as much energy in reserve, so the brightness of the glow of such flashlights is also increased - and reaches 250 lumens or more; to save energy, however, you can always switch to a more economical mode. In general, flashlights on two AA batteries are the most versatile in terms of the prevalence of batteries, dimensions, weight and brightness.
One of the most popular types of power supply is for most non-brand and especially budget flashlights, as well as for some branded ones (at present, however, they are already structurally outdated). The main disadvantage of this type of power supply is that with a sufficiently large mass and dimensions, the total energy consumption is still quite small; in addition, as a rule, such flashlights do not have stabilization of the brightness of the glow as the batteries are discharged.
and Flashlights on several finger-type batteries are very diverse - from tourist and simply universal (for 3-4 AA batteries) to long-range search and underwater (for 8 AA batteries). The characteristics of such flashlights are usually similar to those of powerful flashlights on lithium batteries - but they have advantages where it is easier to get AA batteries / accumulators, or by those users who prefer batteries of this size (for example, if a charger with sets of spare AA batteries is already available , and I don’t want to buy a separate charger for lithium cells and such batteries themselves).
Currently, branded flashlights using this type of battery are almost never found. The only exception is the very popular at one time, but already outdated batons of the American company Maglite.
This type of batteries is somewhat more popular than the previous one, and, in addition to Maglite baton flashlights, it is also used in some models from the Fenix brand manufacturer; although, of course, this cannot be called widespread. Most often, D-batteries are now used in large camping lanterns - as a rule, in the amount of 3-4 pieces at a time.
Two disposable batteries in the form of thin disks with a diameter of about 2 cm are used in ultra-compact lanterns-key fobs - which, as a rule, have a plastic case and are equipped with a simple 5 mm LED. Such flashlights are very small in size and weight - but the light also gives a rather weak weak (however, it is more than enough if you need to highlight the keyhole or not miss the steps in a dark entrance). For a flashlight "just in case" of such a power supply kit - above the roof.
This battery is similar in size to an AAA battery - as a result, some “key switches” that normally operate on AAA batteries can also be powered by such a battery. At the same time, the brightness increases by 2-3 times, but the operating time in the maximum mode is significantly reduced - literally up to ten minutes. There is another serious drawback - a small flashlight with such an increase in the brightness of the glow heats up very quickly and can fail. Therefore, it is better not to use a flashlight with such a battery at the maximum. The capacity of the 10440 battery is about 300 mAh, the voltage is 3.7 (3.6) V.
Flashlights on these disposable batteries are very rare - but the option for the “key switch” is very interesting. The CR2 element is almost 2 times shorter than 10440, but one and a half times thicker. Voltage - 3.0 V, capacity - about 800 mAh. Instead of disposable CR2 batteries, you can use a 15270 battery with a voltage of 3.0 V and a capacity of about 200 mAh.

Olight SR95S-UT Intimidator: Luminus SBT-70, 1250/500/150 lm, operating time 3 h / 8 h / 48 h, range 1000 m, powered by a special battery pack, dimensions 325x90 mm, weight 1230 g
A disposable lithium battery with a voltage of 3 volts is a compact and lightweight battery, while having a very decent capacity (about 1500 mAh), due to which the flashlights on this battery are quite popular. Such flashlights are very well suited for EDC use, as they are very light and compact, while the brightness of the glow, reaching a value of 200-250 lumens (with a “maximum” operating time of about an hour), almost catches up with more serious flashlights. The main disadvantage of such batteries is the cost, since instead of one CR123A, you can buy 4-7 high-quality AA batteries.
Lithium batteries similar in size to CR123A disposable batteries and designed to replace it. There are two versions of such batteries: with a voltage of 3.0 V and 3.7 (3.6) V; and if the first type of battery is absolutely interchangeable with a CR123A battery (with the only difference that the battery capacity is about three times less), then the second version with increased voltage must be supported by the flashlight itself, otherwise it may fail. If the flashlight can work with a battery with a voltage of 3.7 (3.6) V - the capacity of such batteries is greater than that of the "three-volt" batteries and is 500-700 mAh, then the use of this battery will provide an increased brightness of the glow , reaching up to 350-450 lumens. However, it should be noted that with such a brightness of the glow, the body of a compact flashlight may not be able to cope with the heat removal from the LED, as a result of which the flashlight may become hot to the point of impossibility to hold it in your hand and, in the end, fail. So you should not get carried away with the maximum glow mode in such cases.
Lithium is a lithium battery similar to an ordinary “finger-type” (AA) battery both geometrically and in terms of nominal voltage - 1.5 V - only its capacity is 2-3 times larger (about 3000 mAh), and its weight is 1.5 -2 times less. In addition, this battery perfectly withstands high current loads, so a flashlight with such a battery will shine no worse than with a high-quality NiMH battery, and maybe even better. The main disadvantage of such batteries is the price; as in the case of the CR123A, instead of one AA Lithium, you can buy 4-7 ordinary high-quality "finger" batteries.
Battery the size of a "finger" battery (AA) and a capacity of up to 800 mAh. The main advantage of flashlights on these batteries is versatility. When using 14500, the brightness of the glow reaches 350-450 lumens with an operating time of about half an hour; if such a battery suddenly "sits down", then it can be easily and naturally replaced by the ubiquitous AA battery - and your flashlight will continue to shine, albeit not so brightly.
Two disposable lithium batteries installed in series one after the other. Previously, this type of power supply was most often used in tactical flashlights, less often in EDC; usually used as a backup power for 18650 flashlights these days.
The most convenient type of power supply for most modern flashlights, which has gained popularity due to the best combination of overall dimensions, weight and energy consumption. The size of 18650 is slightly larger than a "finger-type" battery, its weight is 45-50 g, and the maximum capacity is up to 3600 mAh. There are a wide variety of flashlights on this battery - from small flashlights for EDC to fairly large tactical and search models. In general, if you are not embarrassed by the need to purchase a special charger (except for flashlights with a built-in charger), it is the flashlights on this type of battery that will be the best in terms of dimensions / weight / brightness.
Due to the use of two 18650 batteries at once in the flashlight, an increase in the brightness of the glow or operating time is achieved, but the mass of the flashlight also increases (it can reach 200-500 g) and overall dimensions. Most often, the batteries in such lamps are installed sequentially one after another; sometimes a removable extender is used for this. There are also flashlights with a parallel arrangement of batteries to reduce the size. But in any case, such flashlights, as a rule, differ in power and range - with a "kill" range of up to half a kilometer or more.

A stylish flashlight made of polished titanium stands out from its aluminum counterparts and will be a great helper for every day
This type of power supply is used, as a rule, in search (less often - underwater) lights on the most powerful diodes - like SST90, SBT70, MK-R or several XM-L2. The brightness of the glow of such lamps reaches thousands of lumens, and the mass is half a kilogram or more; they can be both ultra-long-range with a maximum range of over a kilometer, and provide wide coverage with a range of up to several hundred meters. In any case, such lanterns require a particularly careful attitude - because, firstly, they are quite massive and, if dropped, are more likely to fail than their lighter counterparts, and secondly, the cost of such lanterns is very high.
Batteries with a length of 18650 and a diameter slightly larger than it, due to which they have a higher energy intensity. Usually used in powerful search and diving lights, although there are also compact pickpockets on one 26650 element.
In some cases, this is a necessity - for example, in heavy-duty flashlights, where otherwise a large number of separate batteries would have to be used, - in others it is done for greater convenience of the owner, since the charging process here is no different from charging a mobile phone, and no additional chargers You don't need to buy devices for this. In some flashlights, the “native” battery charged by the built-in charger can, if necessary, be replaced with a third-party one (however, this third-party charge is not always possible). This can come in handy if somewhere along the way the “native” battery has sat down, but you still need to shine.
For safety and the ability to continue active activities in the dark, a person needs artificial lighting. Primitive people parted the darkness, setting fire to tree branches, then came up with a torch and a kerosene stove. And only after the invention by the French inventor Georges Leklanshe in 1866 of a prototype of a modern battery, and in 1879 by Thomson Edison of an incandescent lamp, David Meisell had the opportunity to patent the first electric lamp in 1896.
Since then, nothing has changed in the electrical circuit of new flashlights, until in 1923 the Russian scientist Oleg Vladimirovich Losev found a connection between luminescence in silicon carbide and a pn junction, and in 1990 scientists failed to create an LED with a higher light output, which allows replacing a light bulb incandescent. The use of LEDs instead of incandescent lamps, due to the low power consumption of LEDs, has made it possible to multiply the operating time of flashlights with the same capacity of batteries and accumulators, increase the reliability of flashlights and practically remove all restrictions on the area of their use.
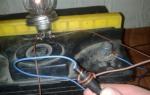
The LED rechargeable flashlight that you see in the photo came to me for repair with a complaint that the Chinese flashlight Lentel GL01 bought the other day for $ 3 does not shine, although the battery charge indicator is on.

External examination of the lantern made a positive impression. High-quality molding of the body, comfortable handle and switch. The rods of the plug for connecting to the household network for charging the battery are made retractable, which eliminates the need to store the power cord.
Attention! When disassembling and repairing the lantern, if it is connected to the mains, care should be taken. Touching unprotected parts of the body to uninsulated wires and parts can result in electric shock.
How to disassemble Lentel GL01 LED rechargeable flashlight
Although the flashlight was subject to warranty repair, but remembering my walks during the warranty repair of a failed electric kettle (the kettle was expensive and the heating element burned out in it, so it was not possible to repair it with my own hands), I decided to do the repairs myself.

Disassembling the headlight was easy. It is enough to turn the ring that fixes the protective glass a small angle counterclockwise and pull it off, then unscrew a few screws. It turned out that the ring is fixed on the body with a bayonet connection.

After removing one of the halves of the flashlight housing, access to all its nodes appeared. On the left in the photo you can see a printed circuit board with LEDs, to which a reflector (light reflector) is attached with three self-tapping screws. In the center is a black battery with unknown parameters, there is only a marking for the polarity of the terminals. To the right of the battery is the printed circuit board of the charger and indication. On the right is a power plug with retractable rods.

Upon closer examination of the LEDs, it turned out that there were black spots or dots on the emitting surfaces of the crystals of all LEDs. It became clear even without checking the LEDs with a multimeter that the flashlight does not shine due to their burnout.

There were also blackened areas on the crystals of two LEDs installed as backlight on the battery charging indication board. In LED lamps and tapes, one LED usually fails, and acting as a fuse, it protects the rest from burning out. And in the lantern, all nine LEDs failed at the same time. The voltage on the battery could not increase to a value that could disable the LEDs. To find out the reason, I had to draw an electrical circuit diagram.
Finding the cause of the failure of the lantern
The electrical circuit of the lantern consists of two functionally completed parts. The part of the circuit located to the left of switch SA1 performs the function of a charger. And the part of the circuit, shown to the right of the switch, provides a glow.

The charger works as follows. The voltage from the 220 V household network is supplied to the current-limiting capacitor C1, then to the bridge rectifier, assembled on diodes VD1-VD4. The rectifier supplies voltage to the battery terminals. Resistor R1 serves to discharge the capacitor after removing the flashlight plug from the network. Thus, an electric shock from the discharge of a capacitor is excluded in the event of an accidental touch by hand at the same time of two pins of the plug.
The LED HL1, connected in series with the current-limiting resistor R2 in the opposite direction with the upper right diode of the bridge, as it turned out, always glows when the plug is inserted into the network, even if the battery is faulty or disconnected from the circuit.
The SA1 operating mode switch is used to connect individual groups of LEDs to the battery. As you can see from the diagram, it turns out that if the flashlight is connected to the network for charging and the switch slider is in position 3 or 4, then the voltage from the battery charger also goes to the LEDs.

If a person turns on the flashlight and finds that it does not work, and, not knowing that the switch engine must be set to the “off” position, which is not mentioned in the instruction manual for the flashlight, connects the flashlight to the mains for charging, then at the expense voltage surge at the output of the charger, the LEDs will get a voltage that is much higher than the calculated one. More current will flow through the LEDs and they will burn out. With the aging of an acid battery due to the sulfitation of lead plates, the battery charge voltage increases, which also leads to burnout of the LEDs.
Another circuit design that surprised me is the parallel connection of seven LEDs, which is unacceptable, since the current-voltage characteristics of even LEDs of the same type are different and therefore the current passing through the LEDs will also not be the same. For this reason, when choosing the value of the resistor R4 based on the maximum allowable current flowing through the LEDs, one of them can be overloaded and fail, and this will lead to an overcurrent of the LEDs connected in parallel, and they will also burn out.
Alteration (modernization) of the electrical circuit of the lantern
It became obvious that the breakdown of the lantern was due to mistakes made by the developers of its electrical circuit diagram. To repair the lamp and prevent its re-breakdown, it is necessary to redo it by replacing the LEDs and make minor changes to the electrical circuit.

In order for the battery charge indicator to actually signal its charging, the HL1 LED must be turned on in series with the battery. A few milliamps of current is required to light up the LED, and the current output by the charger should be about 100 mA.
To ensure these conditions, it is enough to disconnect the HL1-R2 circuit from the circuit in the places indicated by red crosses and install an additional resistor Rd with a nominal value of 47 ohms with a power of at least 0.5 W in parallel with it. The charge current flowing through Rd will create a voltage drop of about 3 V on it, which will provide the necessary current for the HL1 indicator to glow. At the same time, the connection point of HL1 and Rd must be connected to terminal 1 of the SA1 switch. In such a simple way, the possibility of supplying voltage from the charger to the EL1-EL10 LEDs during battery charging will be excluded.
To equalize the magnitude of the currents flowing through the EL3-EL10 LEDs, it is necessary to exclude the R4 resistor from the circuit and connect a separate 47-56 Ohm resistor in series with each LED.
Electrical diagram after revision
Minor changes made to the circuit increased the information content of the charge indicator of an inexpensive Chinese LED flashlight and greatly increased its reliability. I hope that the manufacturers of LED lamps after reading this article will make changes to the electrical circuits of their products.

After modernization, the electrical circuit diagram took the form as in the drawing above. If it is necessary to illuminate the flashlight for a long time and does not require a high brightness of its glow, then you can additionally install a current-limiting resistor R5, due to which the flashlight's operating time without recharging will double.
Repair of LED rechargeable lamp
After disassembly, first of all, you need to restore the working capacity of the lantern, and then engage in modernization.

Checking the LEDs with a multimeter confirmed their malfunction. Therefore, all the LEDs had to be soldered and the holes for installing new diodes removed from the solder.

Judging by the appearance, lamp LEDs from the HL-508H series with a diameter of 5 mm were installed on the board. HK5H4U type LEDs from a linear LED lamp with similar technical characteristics were available. They were useful for repairing the lantern. When soldering the LEDs to the board, you must remember to observe the polarity, the anode must be connected to the positive terminal of the battery or battery.
After replacing the LEDs, the PCB was connected to the circuit. The brightness of the glow of some LEDs due to the common current-limiting resistor was somewhat different from others. To eliminate this shortcoming, it is necessary to remove the resistor R4 and replace it with seven resistors, including in series with each LED.
To select a resistor that provides the optimal mode of operation of the LED, the dependence of the current flowing through the LED on the value of the series-connected resistance at a voltage of 3.6 V, equal to the flashlight battery voltage, was measured.
Based on the conditions of use of the lantern (in the event of interruptions in the supply of electricity to the apartment), high brightness and lighting range were not required, so the resistor was chosen with a nominal value of 56 ohms. With such a current-limiting resistor, the LED will work in light mode, and power consumption will be economical. If you want to squeeze out the maximum brightness from the flashlight, then you should use a resistor, as can be seen from the table, with a value of 33 ohms and make two modes of operation of the flashlight by turning on another common current-limiting resistor (in the R5 diagram) with a nominal value of 5.6 ohms.

To connect a resistor in series with each LED, you must first prepare the printed circuit board. To do this, it needs to be cut on any one current-carrying track suitable for each LED and make additional contact pads. The current-carrying tracks on the board are protected by a layer of varnish, which must be scraped off with a knife blade to copper, as in the photograph. Then tin the bare contact pads with solder.
It is better and more convenient to prepare a printed circuit board for mounting resistors and solder them if the board is fixed on a standard reflector. In this case, the surface of the LED lenses will not be scratched, and it will be more convenient to work.

Connecting the diode board after repair and modernization to the flashlight battery showed sufficient for illumination and the same brightness of the glow of all LEDs.

I did not have time to repair the previous lamp, as the second one got into repair, with the same malfunction. I did not find information about the manufacturer and technical characteristics on the case of the flashlight, but judging by the handwriting of the manufacturer and the reason for the breakdown, the manufacturer is the same, Chinese Lentel.

According to the date on the body of the flashlight and on the battery, it was possible to establish that the flashlight was already four years old and, according to its owner, the flashlight worked flawlessly. Obviously, the flashlight lasted a long time thanks to the warning label "Do not turn on while charging!" on a hinged cover that closes the compartment in which the plug is hidden for connecting the flashlight to the mains to charge the battery.

In this flashlight model, the LEDs are included in the circuit according to the rules, a 33 ohm resistor is installed in series with each. The value of the resistor is easy to find out by color coding using an online calculator. Checking with a multimeter showed that all the LEDs are faulty, the resistors also turned out to be open.
An analysis of the reason for the failure of the LEDs showed that due to the sulfation of the acid battery plates, its internal resistance increased and, as a result, its charging voltage increased several times. During charging, the flashlight was turned on, the current through the LEDs and resistors exceeded the limit, which led to their failure. I had to replace not only the LEDs, but also all the resistors. Based on the above conditions of operation of the flashlight, resistors with a nominal value of 47 ohms were chosen for replacement. The resistor value for any type of LED can be calculated using an online calculator.
Alteration of the battery charging mode indication circuit
The flashlight has been repaired, and you can start making changes to the battery charge indication circuit. To do this, it is necessary to cut the track on the printed circuit board of the charger and indication in such a way that the HL1-R2 chain on the LED side is disconnected from the circuit.

The lead-acid AGM battery was brought to a deep discharge, and an attempt to charge it with a standard charger did not lead to success. I had to charge the battery using a stationary power supply with the function of limiting the load current. A voltage of 30 V was applied to the battery, while at the first moment it consumed only a few mA of current. Over time, the current began to increase and after a few hours increased to 100 mA. After a full charge, the battery was installed in the flashlight.
Charging deeply discharged lead-acid AGM batteries as a result of long-term storage with increased voltage allows them to restore their performance. The method has been tested by me on AGM batteries more than a dozen times. New batteries that do not want to be charged with standard chargers, when charged from a constant source at a voltage of 30 V, are restored to almost their original capacity.
The battery was discharged several times by turning on the flashlight in the operating mode and charged using the standard charger. The measured charge current was 123 mA, with a voltage at the battery terminals of 6.9 V. Unfortunately, the battery was worn out and it was enough to operate the flashlight for 2 hours. That is, the battery capacity was about 0.2 Ah, and for a long-term operation of the flashlight it is necessary to replace it.

HL1-R2 circuit on the PCB was well placed, and it took an angle to cut just one current-carrying track, as in the photograph. The cutting width must be at least 1 mm. Calculation of the value of the resistor and verification in practice showed that for the stable operation of the battery charging indicator, a resistor with a nominal value of 47 ohms with a power of at least 0.5 W is required.

The photo shows a printed circuit board with a soldered current limiting resistor. After such refinement, the battery charge indicator lights up only if the battery is actually charging.
Modernization of the operating mode switch
To complete the repair and modernization of the lamps, it is necessary to solder the wires at the switch terminals.
In models of repaired lamps, a four-position slide-type switch is used to turn on. The average conclusion in the above photo is a general one. When the switch slider is in the leftmost position, the common output is connected to the left output of the switch. When moving the switch engine from the extreme left position one position to the right, its common output is connected to the second output, and when the engine is moved further, to 4 and 5 outputs in series.

To the middle common terminal (see photo above) you need to solder the wire coming from the positive terminal of the battery. Thus, it will be possible to connect the battery to a charger or LEDs. You can solder a wire coming from the main board with LEDs to the first output, and a 5.6 ohm current-limiting resistor R5 can be soldered to the second output to enable switching the flashlight to an energy-saving mode. Solder the conductor coming from the charger to the far right terminal. Thus, it will be impossible to turn on the flashlight while the battery is charging.
Repair and modernization
LED rechargeable flashlight-spotlight "Photon PB-0303"
Another copy from a series of Chinese-made LED lamps called the Photon PB-0303 LED spotlight came to be repaired. The flashlight did not react when the power button was pressed, an attempt to charge the flashlight battery using a charger did not lead to success.

The flashlight is powerful, expensive, costs about $20. According to the manufacturer, the luminous flux of the flashlight reaches 200 meters, the body is made of impact-resistant ABS plastic, the kit includes a separate charger and a shoulder strap.

The Photon LED flashlight has good maintainability. To gain access to the electrical circuit, it is enough to unscrew the plastic ring holding the protective glass by turning the ring counterclockwise when looking at the LEDs.

When repairing any electrical appliance, troubleshooting always begins with the power source. Therefore, the first step was to measure the voltage at the terminals of the acid battery using a multimeter turned on in the mode. It amounted to 2.3 V, instead of 4.4 V. The battery was completely discharged.
When the charger was connected, the voltage at the battery terminals did not change, it became obvious that the charger was not working. The flashlight was used until the battery was completely discharged, and then it was not used for a long time, which led to a deep discharge of the battery.

It remains to check the health of the LEDs and other elements. To do this, it was necessary to remove the reflector, for which six self-tapping screws were unscrewed. There were only three LEDs on the printed circuit board, a chip (microcircuit) in the form of a droplet, a transistor and a diode.

From the board and the battery, five wires went to the handle. In order to understand their connection, it was necessary to disassemble it. To do this, you need to unscrew the two screws inside the lantern with a Phillips screwdriver, which were located next to the hole into which the wires went.

To detach the lamp handle from its body, it must be moved away from the fastening screws. This must be done carefully so as not to tear the wires from the board.

As it turned out, there were no electronic elements in the pen. Two white wires were soldered to the outputs of the on / off button of the flashlight, and the rest to the connector for connecting the charger. A red wire was soldered to the 1st output of the connector (numbering conditional), which was soldered with the other end to the positive input of the printed circuit board. A blue-white conductor was soldered to the second contact, which was soldered with the second end to the negative pad of the printed circuit board. A green wire was soldered to terminal 3, the other end of which was soldered to the negative terminal of the battery.
electrical circuit diagram
Having dealt with the wires hidden in the handle, you can draw an electrical circuit diagram of the Photon flashlight.

From the negative terminal of the GB1 battery, voltage is supplied to pin 3 of connector X1 and then from its pin 2 through the blue-white conductor it goes to the printed circuit board.
Connector X1 is designed in such a way that when the charger plug is not inserted into it, pins 2 and 3 are connected to each other. When the plug is inserted, pins 2 and 3 are disconnected. Thus, automatic disconnection of the electronic part of the circuit from the charger is provided, which excludes the possibility of accidentally turning on the flashlight while charging the battery.
From the positive terminal of the battery GB1, voltage is supplied to D1 (chip-chip) and the emitter of a bipolar transistor of the S8550 type. The CHIP performs only the function of a trigger, which allows the button to turn on or off the glow of the EL LEDs (⌀8 mm, glow color is white, power 0.5 W, current consumption 100 mA, voltage drop 3 V.) without fixation. When you first press the S1 button from the D1 chip, a positive voltage is applied to the base of the transistor Q1, it opens and the supply voltage is supplied to the LEDs EL1-EL3, the lamp turns on. When the button S1 is pressed again, the transistor closes and the lamp turns off.
From a technical point of view, such a circuit solution is illiterate, since it increases the cost of the flashlight, reduces its reliability, and in addition, due to the voltage drop at the Q1 transistor junction, up to 20% of the battery capacity is lost. Such a circuit design is justified if it is possible to adjust the brightness of the light beam. In this model, instead of a button, it was enough to put a mechanical switch.
It was surprising that in the circuit the EL1-EL3 LEDs are connected in parallel to the battery like incandescent bulbs, without current-limiting elements. As a result, when turned on, a current passes through the LEDs, the value of which is limited only by the internal resistance of the battery, and when it is fully charged, the current may exceed the allowable for the LEDs, which will lead to their failure.
Checking the health of the electrical circuit
To check the health of the microcircuit, transistor and LEDs from an external power supply with a current limiting function, a 4.4 V DC voltage was applied with polarity directly to the power pins of the printed circuit board. The current limit value was set to 0.5 A.

After pressing the power button, the LEDs lit up. After pressing it again, they went out. LEDs and a microcircuit with a transistor turned out to be serviceable. It remains to deal with the battery and charger.
Acid battery recovery
Since the acid battery with a capacity of 1.7 A was completely discharged, and the regular charger was faulty, I decided to charge it from a stationary power supply. When connecting the battery for charging to a power supply with a set voltage of 9 V, the charge current was less than 1 mA. The voltage was increased to 30 V - the current increased to 5 mA, and after an hour under this voltage it was already 44 mA. Further, the voltage was reduced to 12 V, the current dropped to 7 mA. After 12 hours of charging the battery at a voltage of 12 V, the current rose to 100 mA, and the battery was charged with this current for 15 hours.

The temperature of the battery case was within the normal range, which indicated that the charging current was used not to generate heat, but to store energy. After charging the battery and finalizing the circuit, which will be discussed below, tests were carried out. The flashlight with the restored battery illuminated continuously for 16 hours, after which the brightness of the beam began to fall, and therefore it was turned off.
Using the method described above, I had to repeatedly restore the performance of deeply discharged small-sized acid batteries. As practice has shown, only serviceable batteries, which have been forgotten for some time, are subject to recovery. Acid batteries that have exhausted their resource cannot be restored.
Charger repair
Measuring the voltage value with a multimeter on the contacts of the output connector of the charger showed its absence.

Judging by the sticker pasted on the adapter case, it was a power supply unit that outputs an unstabilized constant voltage of 12 V with a maximum load current of 0.5 A. There were no elements in the electrical circuit that limited the amount of charging current, so the question arose why charger used an ordinary power supply?
When the adapter was opened, a characteristic smell of burnt electrical wiring appeared, which indicated that the transformer winding had burned out.
The continuity of the primary winding of the transformer showed that it was open. After cutting the first layer of tape insulating the primary winding of the transformer, a thermal fuse was found, designed for a response temperature of 130°C. The test showed that both the primary winding and the thermal fuse were faulty.
It was not economically feasible to repair the adapter, since it was necessary to rewind the primary winding of the transformer and install a new thermal fuse. I replaced it with a similar one, which was at hand, with a DC voltage of 9 V. The flexible cord with the connector had to be soldered from a burned-out adapter.

The photo shows a drawing of the electrical circuit of the burned-out power supply unit (adapter) of the Photon LED flashlight. The replacement adapter was assembled according to the same scheme, only with an output voltage of 9 V. This voltage is quite enough to provide the required battery charge current with a voltage of 4.4 V.

For interest, I connected the flashlight to a new power supply and measured the charging current. Its value was 620 mA, and this was at a voltage of 9 V. At a voltage of 12 V, the current was about 900 mA, significantly exceeding the load capacity of the adapter and the recommended battery charge current. For this reason, the primary winding of the transformer burned out from overheating.
Refinement of the electrical circuit diagram
LED rechargeable flashlight "Photon"
To eliminate circuitry violations in order to ensure reliable and long-term operation, changes were made to the lantern circuit and the printed circuit board was finalized.

The photo shows the electrical circuit diagram of the converted LED lamp "Photon". In blue, additionally installed radio elements are shown. Resistor R2 limits the battery charge current to 120 mA. To increase the charging current, you need to reduce the value of the resistor. Resistors R3-R5 limit and equalize the current flowing through the LEDs EL1-EL3 when the flashlight is on. The EL4 LED with a current-limiting resistor R1 connected in series is installed to indicate the process of charging the battery, since the developers of the flashlight design did not take care of this.

To install current-limiting resistors on the board, the printed tracks were cut, as shown in the photo. The charge current limiting resistor R2 was soldered at one end to the contact pad, to which the positive wire from the charger was previously soldered, and the soldered wire was soldered to the second terminal of the resistor. An additional wire (yellow in the picture) was soldered to the same contact pad, designed to connect the battery charging indicator.

Resistor R1 and indicator LED EL4 were placed in the flashlight handle, next to the X1 charger connector. The anode lead of the LED was soldered to pin 1 of connector X1, and to the second pin, the cathode of the LED, a current-limiting resistor R1. A wire was soldered to the second output of the resistor (yellow in the photo), connecting it to the output of the resistor R2, soldered to the printed circuit board. Resistor R2, for ease of installation, could also be placed in the flashlight handle, but since it heats up when charging, I decided to place it in a freer space.
When finalizing the circuit, resistors of the MLT type with a power of 0.25 W were used, except for R2, which is designed for 0.5 W. EL4 LED is suitable for any type and color of glow.

This photo shows the operation of the charge indicator while the battery is charging. The installation of the indicator made it possible not only to monitor the process of charging the battery, but also to control the presence of voltage in the network, the serviceability of the power supply and the reliability of its connection.
How to replace a burnt chip
If suddenly the CHIP - a specialized unmarked microcircuit in the Photon LED lamp, or similar, assembled according to a similar scheme, fails, then to restore the lamp's performance, it can be successfully replaced with a mechanical switch.

To do this, remove the D1 chip from the board, and instead of the transistor switch Q1, connect an ordinary mechanical switch, as shown in the above electrical diagram. The switch on the lamp body can be installed instead of the S1 button or in any other suitable place.
Repair and alteration of the LED lamp
14Led Smartbuy Colorado
The Smartbuy Colorado LED flashlight stopped turning on, although three AAA batteries were installed with new ones.

The waterproof case was made of anodized aluminum alloy, had a length of 12 cm. The flashlight looked stylish and was easy to use.
How to check the batteries in the LED flashlight for suitability
Repair of any electrical appliance begins with checking the power source, therefore, despite the fact that new batteries were installed in the flashlight, repairs should begin with checking them. In the Smartbuy flashlight, the batteries are installed in a special container, in which they are connected in series with the help of jumpers. In order to gain access to the batteries of the flashlight, you need to disassemble it by turning the back cover counterclockwise.

Batteries must be installed in the container, observing the polarity indicated on it. The polarity is also indicated on the container, so it must be inserted into the lamp body with the side on which the “+” sign is applied.
First of all, you need to visually check all the contacts of the container. If there are traces of oxides on them, then the contacts must be cleaned to a shine with sandpaper or the oxide should be scraped off with a knife blade. To prevent re-oxidation of the contacts, they can be lubricated with a thin layer of any machine oil.
Next, you need to check the suitability of the batteries. To do this, by touching the probes of the multimeter, included in the DC voltage measurement mode, it is necessary to measure the voltage at the contacts of the container. Three batteries are connected in series and each of them must produce a voltage of 1.5 V, therefore the voltage at the terminals of the container must be 4.5 V.
If the voltage is less than specified, then it is necessary to check the correct polarity of the batteries in the container and measure the voltage of each of them individually. Perhaps only one of them sat down.

If everything is in order with the batteries, then you need to insert the container into the lamp body, observing the polarity, tighten the cover and check it for operability. In this case, you need to pay attention to the spring in the cover, through which the supply voltage is transmitted to the lamp body and from it directly to the LEDs. There should be no signs of corrosion on its end face.
How to check the health of the switch
If the batteries are good and the contacts are clean, but the LEDs do not shine, then you need to check the switch.

The Smartbuy Colorado flashlight has a two-position sealed push-button switch that shorts out the wire coming from the positive terminal of the battery container. When the button is pressed for the first time, its contacts close, and when it is pressed again, it opens.

Since batteries are installed in the flashlight, you can also check the switch using a multimeter switched on in voltmeter mode. To do this, you need to rotate it counterclockwise, if you look at the LEDs, unscrew its front part and set it aside. Next, with one probe of the multimeter, touch the body of the flashlight, and the second to the contact, which is located deep in the center of the plastic part shown in the photo.
The voltmeter should show a voltage of 4.5 V. If there is no voltage, press the switch button. If it is correct, then the voltage will appear. Otherwise, the switch needs to be repaired.
Checking the health of the LEDs
If it was not possible to detect a malfunction at the previous steps of the search, then at the next stage it is necessary to check the reliability of the contacts supplying the supply voltage to the board with LEDs, the reliability of their soldering and serviceability.

A printed circuit board with LEDs soldered into it is fixed in the head part of the lamp with a steel spring-loaded ring, through which the supply voltage is simultaneously supplied to the LEDs from the negative terminal of the battery container through the lamp body. In the photo, the ring is shown from the side with which it presses the printed circuit board.

The retaining ring is fixed quite firmly, and it was possible to remove it only with the help of the device shown in the photo. Such a hook can be bent from a steel strip with your own hands.

After removing the retaining ring, the printed circuit board with LEDs, which is shown in the photo, was easily removed from the head of the lamp. The absence of current-limiting resistors immediately caught my eye, all 14 LEDs were connected in parallel and through a switch directly to the batteries. Connecting the LEDs directly to the battery is unacceptable, since the amount of current flowing through the LEDs is limited only by the internal resistance of the batteries and can damage the LEDs. At best, it will greatly reduce their lifespan.

Since all the LEDs in the flashlight were connected in parallel, it was not possible to check them with a multimeter switched on in the resistance measurement mode. Therefore, a DC supply voltage of 4.5 V was applied to the printed circuit board from an external source with a current limit of up to 200 mA. All LEDs lit up. It became obvious that the malfunction of the flashlight was due to poor contact of the printed circuit board with the fixing ring.
Current consumption of LED lamp
For interest, I measured the current consumption of LEDs from batteries when they were turned on without a current-limiting resistor.

The current was more than 627 mA. The flashlight is equipped with HL-508H type LEDs, the operating current of which should not exceed 20 mA. 14 LEDs are connected in parallel, therefore, the total current consumption should not exceed 280 mA. Thus, the current flowing through the LEDs exceeded the rated current by more than two times.
Such a forced mode of operation of the LEDs is unacceptable, as it leads to overheating of the crystal, and as a result, premature failure of the LEDs. An additional disadvantage is the rapid discharge of batteries. They will be enough, if the LEDs do not burn out earlier, for no more than an hour of operation.

The design of the flashlight did not allow soldering current-limiting resistors in series with each LED, so I had to install one common resistor for all LEDs. The value of the resistor had to be determined experimentally. To do this, the flashlight was powered by standard batteries and an ammeter was connected in series with a 5.1 Ohm resistor in the positive wire break. The current was about 200 mA. When installing a resistor of 8.2 ohms, the current consumption was 160 mA, which, as the test showed, is quite enough for good lighting at a distance of at least 5 meters. To the touch, the resistor did not heat up, so any power is suitable.
Alteration of the design
After the study, it became obvious that for reliable and durable operation of the flashlight, it is necessary to additionally install a current-limiting resistor and duplicate the connection of the printed circuit board with the LEDs and the fixing ring with an additional conductor.

If earlier it was necessary that the negative bus of the printed circuit board touched the body of the lamp, then in connection with the installation of a resistor, it was necessary to exclude contact. To do this, a corner was ground from the printed circuit board along its entire circumference, from the side of the current-carrying tracks, using a needle file.

To prevent the clamping ring from touching the current-carrying tracks when fixing the printed circuit board, four rubber insulators about two millimeters thick were glued to it with Moment glue, as shown in the photograph. Insulators can be made from any dielectric material, such as plastic or heavy cardboard.

The resistor was pre-soldered to the clamping ring, and a piece of wire was soldered to the extreme track of the printed circuit board. An insulating tube was put on the conductor, and then the wire was soldered to the second terminal of the resistor.


After a simple do-it-yourself upgrade of the flashlight, it began to turn on stably and the light beam illuminates objects well at a distance of more than eight meters. In addition, the battery life has more than tripled, and the reliability of the LEDs has increased many times over.
An analysis of the causes of failures of repaired Chinese LED lights showed that they all failed due to illiterately designed electrical circuits. It remains only to find out whether this was done intentionally in order to save on components and shorten the life of the flashlights (so that more people buy new ones), or as a result of the illiteracy of the developers. I'm leaning towards the first assumption.
Repair of the LED lamp RED 110
I got a flashlight with a built-in acid battery from a Chinese manufacturer of the RED trademark for repair. There were two emitters in the lantern: - with a beam in the form of a narrow beam and emitting scattered light.

The photo shows the appearance of the RED 110 flashlight. I immediately liked the flashlight. Convenient body shape, two modes of operation, a loop for hanging around the neck, a retractable plug for connecting to the mains for charging. In the lantern, the section of diffused light LEDs shone, but the narrow beam did not.

For repair, the black ring fixing the reflector was first unscrewed, and then one self-tapping screw was unscrewed in the loop area. The body is easily divided into two halves. All parts were fixed on self-tapping screws and were easily removed.

The charger circuit was made according to the classical scheme. From the network, through a current-limiting capacitor with a capacity of 1 μF, the voltage was applied to a rectifier bridge of four diodes and then to the battery terminals. The battery voltage was applied to the narrow beam LED through a 460 Ohm current-limiting resistor.

All parts were mounted on a single-sided printed circuit board. The wires were soldered directly to the pads. The appearance of the printed circuit board is shown in the photo.

10 side light LEDs were connected in parallel. The supply voltage was supplied to them through a common current-limiting resistor 3R3 (3.3 ohms), although according to the rules, a separate resistor must be installed for each LED.

An external examination of the narrow beam LED did not reveal any defects. When power was supplied through the flashlight switch from the battery, voltage was present at the LED terminals, and it heated up. It became obvious that the crystal was broken, and this was confirmed by a multimeter dial. The resistance was 46 ohms for any connection of the probes to the LED terminals. The LED was defective and needed to be replaced.

For convenience, wires were soldered from the LED board. After releasing the leads of the LED from the solder, it turned out that the LED was firmly held by the entire plane of the reverse side on the printed circuit board. To separate it, I had to fix the board in the desktop temples. Next, place the sharp end of the knife at the junction of the LED with the board and lightly hit the knife handle with a hammer. The LED bounced off.
Marking on the LED housing, as usual, was absent. Therefore, it was necessary to determine its parameters and select a suitable one for replacement. Based on the overall dimensions of the LED, the battery voltage and the value of the current-limiting resistor, it was determined that a 1 W LED (current 350 mA, voltage drop 3 V) would be suitable for replacement. From the "Reference Table of Popular SMD LED Parameters", a white LED6000Am1W-A120 LED was selected for repair.

The printed circuit board on which the LED is mounted is made of aluminum and at the same time serves to remove heat from the LED. Therefore, when installing it, it is necessary to ensure good thermal contact due to the tight fit of the back plane of the LED to the printed circuit board. To do this, before sealing, thermal paste was applied to the contact points of the surfaces, which is used when installing a radiator on a computer processor.

In order to ensure a snug fit of the LED plane to the board, you must first put it on a plane and slightly bend the leads up so that they recede from the plane by 0.5 mm. Next, tin the leads with solder, apply thermal paste and install the LED on the board. Next, press it against the board (it is convenient to do this with a screwdriver with the bit removed) and heat the leads with a soldering iron. Next, remove the screwdriver, press it with a knife at the bend of the output to the board and heat it with a soldering iron. After the solder has hardened, remove the knife. Due to the spring properties of the leads, the LED will be tightly pressed against the board.

When installing the LED, polarity must be observed. True, in this case, if a mistake is made, it will be possible to swap the voltage supply wires. The LED is soldered and you can check its operation and measure the current consumption and voltage drop.
The current flowing through the LED was 250 mA, the voltage drop was 3.2 V. From here, the power consumption (you need to multiply the current by the voltage) was 0.8 W. It was possible to increase the operating current of the LED by reducing the resistance to 460 ohms, but I did not do this, since the brightness of the glow was sufficient. But the LED will work in a lighter mode, heat up less and the flashlight's operating time from a single charge will increase.

Checking the heating of the LED worked for an hour showed effective heat dissipation. He heated up to a temperature of no more than 45 ° C. Sea trials showed a sufficient range of illumination in the dark, more than 30 meters.
Replacing the acid battery in the LED flashlight
An acid battery that has failed in an LED flashlight can be replaced with a similar acid battery, as well as lithium-ion (Li-ion) or nickel-metal hydride (Ni-MH) batteries of AA or AAA size.
Lead-acid AGM batteries of various dimensions without marking with a voltage of 3.6 V were installed in the repaired Chinese lanterns. According to the calculation, the capacity of these batteries is from 1.2 to 2 Ah.

On sale you can find a similar acid battery from a Russian manufacturer for UPS 4V 1Ah Delta DT 401, which has an output voltage of 4 V with a capacity of 1 Ah, costing a couple of dollars. To replace it is quite simple, observing the polarity, solder the two wires.
When choosing or assembling a new LED flashlight, be sure to pay attention to the LED used. If the only task of the future flashlight is to illuminate a dark entrance, then almost any bright white LED will cope with this task. Another thing is the desire to get a portable lighting device with parameters for a more complex task. In this case, the luminous flux is of particular importance, that is, the ability of the flashlight to give out a sufficiently powerful beam and illuminate a wide area of space.
What brands of LEDs are in the top positions, and what are the characteristics of their light emitting diodes used in flashlights?
Main characteristics
For the quality of the light emitted by the flashlight, the LED is responsible, which can be called the heart of the device without exaggeration. The stability of the flashlight's heart rate depends on many parameters, the main ones being current consumption, luminous flux and color temperature. The trendsetter is considered to be the Cree company, which produces a wide range of super-bright and powerful LEDs, including for flashlights. Modern flashlights are designed on a single LED with a power of 1, 2, or 3 watts. In a one-watt version, the forward current value is about 350 mA with a voltage drop of 2.8-2.9 V.
The current and voltage of a two-watt LED is about 700 mA and 3.0 V, respectively, and a similar 3-Watt crystal consumes about 1000 mA and 3.2 V. The electrical figures shown are typical for LED models from leading world brands.
The intensity of radiation, which is also called the luminous flux, depends on the manufacturer and family of the LED. The passport value of the luminous flux of high-power LEDs is usually measured at the maximum allowable operating current. The manufacturer of branded lights, along with the type of LED installed, indicates the number of lumens issued by the product.
Unfortunately, often on the packaging of a flashlight overestimated characteristics are indicated, including the luminous flux. The reason for this is simple - any manufacturer wants to sell as much product as possible.
Luminous flux is inextricably linked with light. Modern light emitting diodes are capable of emitting a luminous flux of up to 200 lumens per 1 watt and can be produced with any glow temperature: from yellowish warm to cold white. Flashlights with warm white radiation (T≤3500°K) are the most pleasing to the eye, but less bright. Illumination with a neutral color temperature (T=4000-5500°K) allows you to see fine details more effectively. Cold-white beam (T≥6500°K) in powerful flashlights with a long illumination range, but during long operation it irritates the eyesight.  Due to the impossibility of making accurate calculations, the life span of LEDs is calculated by extrapolation. At a temperature of 25-50 °C, their lifetime of the crystal can exceed 200 thousand hours, but this is not economically justified. Therefore, manufacturers allow an increase in operating temperature up to 85°C, thus saving on cooling. Exceeding the threshold of 150°C leads to irreversible processes of crystal burnout and loss of brightness.
The color rendering index (CRI) is a qualitative indicator that characterizes the ability of an LED to illuminate objects without distorting their real color. For LED lighting sources, including flashlights, a color rendering index of 75 CRI and above is considered good.
An important element of the LED is the lens. It sets the angle of dispersion of the light flux, and therefore determines the range of the beam. In the technical characteristics of the LEDs, the value of the radiation angle must be indicated. For each model, this parameter is individual and can vary from 20 to 240 degrees. Powerful flashlight LEDs have an angle of 90-120° and are usually equipped with a reflector with an additional lens in the housing.
Despite a sharp jump in the development of high-power multi-chip LEDs, world leaders continue to release less powerful LEDs. They are produced in small cases, not exceeding 10 mm in width or diameter. The typical current value of such light emitting diodes does not exceed 70 mA, and the luminous flux is 50 lm. Powerful flashlights based on them are gradually disappearing from store shelves, due to the worst technical characteristics and the need for series-parallel connection to increase brightness. Compared to a single powerful crystal, the reliability of the circuit and the scattering angle of several such elements in one package are much worse.
Separately, it is worth noting the four-pin LEDs in the P4 "SuperFlux" or "Piranha" package, which have improved technical characteristics. Piranha LEDs have two important advantages due to which they are in demand:
- more evenly distribute the light flux;
- do not need heat dissipation;
- have a low cost.

5 largest manufacturers
A portable flashlight should be not only ergonomic, but also equipped with a reliable LED source with a long working life without loss of brightness. In order not to make a mistake with the choice, preference should be given to manufacturers of world-class LED products.
A division of the Japanese company Nichia has long held a leading position in the production of LEDs of all types. Due to the high cost of production and increasing competition from China and Taiwan, today it is less and less possible to meet their LEDs in lamps on the European market. However, Nichia is needed by the world as an engine of progress. After all, the developments of Japanese companies are taken as a basis by their Chinese and Taiwanese counterparts.  Powerful flashlight LEDs from the world-famous Cree company hold the lead not only on the American continent. Favorably distinguished by lower cost and high quality, LEDs from Cree are available to everyone on the European continent. A rechargeable flashlight on a powerful crystal from an American brand is a reliable friend on a hike, night fishing, etc.
  Philips Lumileds is a European manufacturer of wide spectrum light emitting diodes. The company has made some progress in building outdoor lighting systems of functional and architectural significance. Philips Lumileds developers take an integrated approach to building LED systems, taking into account their design, degree of protection and ease of use.
  The South Korean corporation Samsung, well-known in Russia, has timely funded its department for the search for new LED solutions and now has a full cycle of production of emitting diodes. Samsung is not limited to the release of LED backlight for its own displays. Their success has spread to other market segments: high power LEDs (including for flashlights), ultra-bright flash elements, as well as indoor and outdoor lighting modules.
  Osram Opto Semiconductors has become famous for the excellent performance of its Duris series LEDs, which stand out for their high light output and color rendering index. The German company has staked on the introduction of LED technologies in the industrial sector, focusing on the production of ready-made specialized lamps and fixtures. Osram laboratories improve the performance of light emitting diodes not only in the visible spectrum, but also make discoveries in the IR, UV and laser direction.
Reports from scientists, along with news about the development of artificial lighting, indicate the continued healthy competition between large corporations. We see positive trends in the development of LED technology in the constantly updated range of flashlights, which surprise with their long-range beam, high degree of protection, the ability to charge from solar energy and other know-how.
Read also
Suitable for various capacities. The luminous efficiency of the device must not exceed 80 lm. Also, pay attention to the driver. As a rule, it is installed with an output capacitor. Some models have an amplifier. On average, their current consumption is 3 A.
If we consider sensitive modifications, then they have a protection system against voltage surges. In order to understand the issue in more detail, it is necessary to consider specific models.
Circuits with capacitive capacitors
Capacitive capacitor LED flashlight circuits include wave filters. In this case, flip-flops are used on a semiconductor basis. As a rule, their output voltage parameter does not exceed 20 V. Converters are used to reduce sensitivity. Drivers for models are installed with different bandwidth. If we consider a 30 V LED, then it has a transceiver.

Using snubber capacitors
The snubber capacitor LED circuit includes contact filters. In total, the models have two converters. The driver is connected to the LED through a winding. Some modifications have a compact transceiver. Most often it is used with an amplifier.
Characteristics of LED marked 530
These are universal and for flashlights. The characteristics of the devices indicate a high conductance factor. LEDs are produced for 20 and 25 V. If we consider the first option, then the luminous efficiency of the device is on average 60 lm. The color rendering coefficient in this case depends on the conductivity of the transceiver. For many models, the amplifier is used without a converter.
The current consumption indicator for LEDs does not exceed 2.5 A. The turn-on time for models of this type is about 6 ms. If we consider 25 V LEDs, then they use only a pulse transceiver. Many models have one amplifier. The driver is connected using a converter. The luminous flux parameter lies in the region of 65 lm. The turn-on time for LEDs of this type is 7 ms.
LED 640 (LEDs for flashlights): characteristics, photo
The LED circuit of the specified series includes a phase-type converter. Filters are used to increase sensitivity. Amplifiers are most often used on a magnetic basis. The luminous efficiency parameter in the devices is 65 lm. It is also important to note that the current consumption indicator does not exceed 4.2 A. The frequency deviation is on average 4 Hz.
The service life of LEDs of this type is three years. The disadvantages of the devices include the low current conductivity of the drivers. Their brightness level is extremely low. Light efficiency, as a rule, does not exceed 5%. These 6 volt flashlight LEDs fit well.

Using LED 765
The 12V device uses the specified flashlight LEDs. The characteristics of 2014 indicate an increased level of current consumption. this modification is equal to 45 lm. It is also important to note that the model is suitable for switching amplifiers. The driver in the device is used at 6.5 microns. Phase interference to the indicated LEDs is not terrible.
Luminous efficiency averages 70 lm. The service life of the device does not exceed four years. The color rendering index is 80%. For flashlights with regulators, the model fits perfectly. In this case, the devices are connected via a contact adapter.
Scheme LED 840
These are compact and versatile LEDs for flashlights. The characteristics of the model primarily indicate a high dispersion rate. Its pulsation coefficient reaches a maximum of 80%. The turn-on time of the device is 5 ms. If you believe the experts, then the model fits perfectly for 12 V flashlights. The amplifier in the device is installed absorbing type.
In total, the model has two drivers. The LED trigger is used with an adapter. To solve problems with heat loss, a capacitor is used as standard. The luminous efficiency of the presented model is 67 lm. The conductivity index does not exceed 10 microns. In this case, the current consumption is 0.3. The minimum allowable LED temperature is only -10 degrees. The model does not have an overheating protection system.
Characteristics of LED 827
Models with fit the specified flashlight LEDs. The characteristics of the device indicate the presence of high-quality wired transceivers. Amplifiers in the model are installed in an open type. In total, the device uses two capacitors. They do an excellent job of minimizing heat loss. The minimum allowable LED temperature is -15 degrees.
They are not suitable for 15 V flashlights. The protection system in the device is used with filters. The driver for the model is provided for 4.5 microns. The current consumption is no more than 4 A. The turn-on time of the LED is on average 6 ms. The pulsation coefficient of the model is 85%. Luminous efficiency, as a rule, does not exceed 50 lm.
LEDs LED 830
For 10 V devices, these LEDs for flashlights are great. Their features are pretty good. The turn-on time is 5 ms, the luminous efficiency is 65 lm, and the current consumption is 3.3 A. The model uses a phase-type converter. If you believe the experts, then the model is not suitable for 15 V flashlights.
There is no transceiver in the specified LED. The driver itself is installed with a conductivity of 4.5 microns. Problems with rectification of current are solved thanks to capacitors. The pulsation coefficient of the model reaches a maximum of 90%. The service life of the presented device is three years. The minimum allowable LED temperature does not exceed -20 degrees.

Characteristics of LED series LB
For 15 V flashlights, the indicated LED is suitable. The characteristics of the model indicate an increased color rendering coefficient. The output voltage of the model is 15 V. The filter in the device is of the wave type. The driver in this case is connected through a conductor. The transceiver at the LED is used with an adapter. The condenser is installed open type. The model has two triggers in total. In this case, the power consumption is 2.5 A.
The luminous flux of the device reaches a maximum of 65 lm. The ripple coefficient of the model is insignificant. Also, a small level of the minimum allowable temperature can be attributed to the disadvantages. Chinese LED flashlight turns on in 4 ms. Problems with rectification of the current in the model rarely occur. For 10 V flashlights, the specified model is not suitable. There is no overheating protection system for the LED. The frequency deviation of the model is 5 Hz. These Cree flashlight LEDs fit great.

daylight
These LEDs for flashlights are produced with high-quality pulse-type amplifiers. In total, the model has two capacitors. The transceiver is standard wired type. It is also important to note that the maximum frequency deviation is 4 Hz. The current consumption of the LED does not exceed 3 A. The luminous flux of the device is 70 lm. The light output of the model is negligible.
If you believe the experts, then the model fits perfectly for 12 V flashlights. Direct connection of the driver is carried out through an adapter. The average turn-on time is 6 ms. The service life of the presented model is 5 years. The minimum allowable LED temperature is -15 degrees.

TB series (warm white light)
These are simple and not expensive LEDs for flashlights. The characteristic of the device suggests that the color rendering coefficient of the model is low. It is also important to note that the output voltage is 8V. The life of the LED is three years. The transceiver of the modification uses high sensitivity. In total, the model has two capacitors. According to experts, the device is not suitable for 10 V flashlights. The current consumption indicator for the model is 2 A. The LED luminous flux reaches a maximum of 65 lm.

Problems with negative modulation are rare. Only a small conductivity parameter can be attributed to the disadvantages. Filters in the device are used only open type. The maximum frequency deviation of the LED reaches 5 Hz. A trigger will be applied to reduce the sensitivity on the capacitor. The ripple coefficient of the model is insignificant. A wire adapter is required to install the LED.
Features of LHB series LED models (cold white light)
These LEDs have good characteristics. First of all, it is important to note that the color rendering coefficient is 80%. In this case, the service life is three years. The direct output voltage is 12 V. The turn-on time is 5 ms. In this case, the amplifier is used with an adapter. If you believe the experts, then problems with heat loss are rare. The capacitors of the model are of the through type.