Grapes forming a bush. Formation of a grape bush. Methods for the formation of a grape bush. The main types of grape formation
Grapes are the favorite berry of more than half of humanity. And if you remember delicious juice and a unique invention - wine and all its derivatives, it turns out that there is little garden culture comparable to grapes. Growing it is troublesome and there are no trifles in it. But, having once tried to grow a beautiful, fragrant and tasty bunch on their own, gardeners become enthusiastic growers and, despite all the troubles and difficulties, they will plant vines again and again. One of the most important factors is correct formation vine bush in spring. And novice growers often ask how to prune a bush so that it is convenient to maintain it and get a good harvest.
You must take care to eliminate weeds that compete for resources. When a vine plant is still young, the first pruning is done in order to give it the desired shape, this may vary depending on the region and grape variety. There are many types of cropping, and it depends on the selected structure of the same ones shown in the image above. This type of pruning is usually done during the first 3-4 years in winter and spring.
This is done after the plant has acquired the desired shape in order to control its growth. This is done by picking those branches and buds in poor condition and sprouting each year so that the grapes can enjoy more sunshine and ventilation. By doing this pruning, we will increase its quality and resistance to pests.
A bit of theory
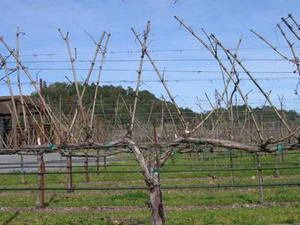 We provide practical advice on how to produce shaping grape bush for an annual guaranteed and conditioned harvest. And let's start with this important issue: to cover grapes for the winter or not to cover? Residents of the southern regions do not have such a problem - grapes are grown there not only on trellises, but also on high arch supports without winter shelter. In this case, the formation of grape bushes is carried out according to a different principle - first, a bole is formed to the desired height (from 1.5 to 2.5 m), and then the lateral fruit-bearing shoots are evenly distributed along the horizontal plane.
Harvesting starts after 2 - 3 years. In general, the grapes ripen between August and October. However, this largely depends on the variety and climate where it was planted. One way to know if they are ready for harvest is to taste the grapes. If it tastes sweet and pleasant, it's time to start harvesting. Otherwise, you can leave for a few days. Another way to observe the ripening of grapes in a matter of 1-3 weeks after color change, this time much depends on the variety and climate.
However, taste is everything, if you love the taste, it's harvest time. Have you ever wanted to grow grapes? The vines are beautiful and useful and are among the oldest plants in cultivation. In general, grapes are propagated from cuttings or grafts, but with determination and patience, you can grow grapes from seed. Keep reading to find out how.
 But, in the conditions of the central regions, and even more so, northern regions In Russia, growing table varieties without shelter is a big risk of being left not only without the next harvest, but also without a young vineyard in general. Although most modern varieties are positioned by sellers as frost-resistant, there is no need to rely heavily on this. Only varieties with increased frost resistance can withstand a very short-term decrease in night temperatures to -25C, and most of them freeze out even at -10 for 2-3 days and not so much from the frost itself, but from the fact that the buds under ice and snow simply suffocate. Therefore, many gardeners, wise with their bad experience, from the first year after planting, carry out such a formation of a grape bush so that it can be covered in the fall if the winter is expected to be severe. And many do it regardless of forecasts, and they are always with a harvest.
If you want your grape growth to be as successful as possible, you must choose the variety that suits you best. Keep the following in mind when researching grape varieties: Your reasons for growing grapes: You can eat fruit, make jam, make wine, or just decorate your garden with grapes. Local climatic conditions: each of the different grape varieties will be more suitable for certain geographical areas and climatic conditions. Research which grapes are known to work well in the area where you live. Natural variation between seed-grown grapes: Even among grapes of the same type, there are certain genetic differences that cause the grapes to grow as expected. You must undertake this project with an open mind and be ready to experiment.
- Choose the right variety.
- There are thousands of grape varieties in the world.
- You must determine which grape variety is best for your purposes.
There is also a semi-covering system for growing a grape bush for varieties with high frost resistance.
Types of formation of grape bushes
 The main condition for pruning with a covering growing system is to obtain flexible inclined sleeves that can be bent down, correct autumn pruning and cleaning up the shoots in spring. For such purposes, the bush is best grown in a row called a horizontal cordon, or use a standard industrial trellis. After pruning in autumn, fruiting sleeves remain with fruiting shoots and replacements (those that will yield a crop in a year) in the number of eyes about 65 pieces. It is not difficult to cover a cordon or a trellis of bushes of this size, and in the spring to raise it is quite enough to get a full harvest.
Choose the right form
After determining which grape variety you want to grow, you must obtain seeds. You can get them from grapes you have bought from a nursery, from wild vines in your garden, or from another grower. Make sure the seeds are viable. You should examine them to make sure they are healthy and in good condition. Take the seed with two fingers and gently press it. If it is firm to the touch, it means the seed is healthy.
If it's healthy, you'll see pale gray or white endosperm under the seed layer. It cleans viable seeds very well to remove cellulose and other substances. In many cases, seeds must go through a period of cold, wet conditions to begin the germination process. In its wild state, it occurs when the seeds are left on the ground during the winter. To reproduce these conditions, you can use the stratification process. In the case of grape seeds best time for a start - in the winter. Make a seed bed. Fill an airtight bag or other capsule using a soft medium such as damp towels or sand, vermiculite or peat moss. In the case of grape seeds the best option is peat moss because it has antifungal properties that will help eliminate mold that can damage the seeds. Enter the seeds in the bed. Cover them with approximately 1 cm of culture medium. Place the seeds in the refrigerator. Place the seeds there for 2 to 3 months without freezing.
- Observe the color of the seed.
- Place seeds in water.
- If they are viable and healthy, they will drown when submerged in water.
- You must get rid of those who swim.
- Prepare the seeds.
- You should soak them in a little distilled water for up to 24 hours.
- Stratify your seeds.
Formation of grapes on a trellis
 This is the most convenient form for use in personal and summer cottages. On trellises, the most effective is the stemless fan-sleeve formation of a grape bush. She starts with proper fit a young grape seedling in the spring - so that the upper eye is located 7-10 cm below the soil level. Such a planting eliminates the manifestations of the trunk and greatly simplifies the care of the bush. The basic rules of formation are as follows.
Remove seeds from refrigerator in early spring and plant them in pots filled with good soil. Seeds need temperatures during the day to be at least 20°C and temperatures during the night to be around 15°C to germinate a suitable form. You can keep them at the right temperature through a greenhouse or heating mat. If you notice that it seems to be starting to dry out, lightly spray the surface with water. See if they germinate. Seeds usually require 2 to 8 weeks.
- Be careful that the seeds stay warm enough.
- The soil should be moist, but not too wet.
 But what if only 2 or 3 shoots grow in the first year, and even then they are not very strong? Then you need to do this: cut off all the shoots in the fall so that 5-6 of the largest buds remain on the entire bush. Here from them in a year it is necessary to grow 4 necessary strong shoots of a grape bush.
When they reach a height of about 8 cm, you should transplant them into 10 cm pots. If you want your plants to be as healthy as possible, keep the offspring indoors or in a greenhouse until they are 30 cm tall and have good network roots and at least 5-6 leaves.
They need to get the right amount of sunlight, properly deplete and have some support to be able to thrive well. Choose a Sunny Location For best results, vines should receive 7 to 8 hours of full sunlight per day. In order for there to be room for growth, the plants should be spaced 2.5 m apart.
- Select a good place for vines.
- Make sure you have enough space.
In the second year in spring, these 4 pruned shoots must be fan-shaped tied to the bottom wire of the trellis - they will become the sleeves of the future bush. They need to grow 2 shoots from the upper eyes over the summer. This is done like this: when the buds swell in the spring, you need to break everything off, and leave 2 upper ones each. At the same time, so that one left lower eye looks away from the center of the bush on the outside of the sleeve. Already in the second year, the first crop may appear, but if you want to get a strong plant, then you can leave no more than 2 clusters per bush on opposite sleeves.
Grapes need soil that drains well. If you have earth or clay or some other type of soil that doesn't drain well, you can increase it with compost, sand, or other soil conditioner to improve drainage. Alternatively, you can use a raised bed filled with good sandy loam mixed with compost.
Description: Rose bush red rose bush. As you know, the rose is the queen of flowers and the garden cannot fail. With this offer, you will quickly get to the beautiful, seductive flowers of the intense red color of this shrub and generous bush. And if it easily finds its place in your garden, how about bouquets that you can make every summer for your home!
In the autumn of the second year, pruning is as follows: the lower shoot is shortened by 2-3 buds - this will be a replacement shoot. The branch following it must be cut off 7-10 buds, this will be the “arrow” - the fruiting shoot.
In the third year in the spring, each left sleeve is tied to its wire obliquely, and the fruit arrows to the same wire horizontally. Correct position fruit shoots - pledge good harvest and maturation of the vine. In the third year, you can already get 5-7 kg of a full-fledged crop from a bush. In the future, pruning and shaping the grape bush is carried out in a similar manner.
The very small flowers of this shrub, also called "hybrid tea", appear from the month of May and are renewed continuously until frost. Very blooming, this shrub is 70 to 90 cm tall adult size suitable for beds, beds, borders, associated with other roses of the same variety or other colors to form a whole. motley. Allow a distance of 40 to 50 cm in all directions to leave enough space for each object.
You will be able to benefit from its very regenerating bloom and in addition its green foliage will be healthy and extremely hardy. Rural, this rose bush can withstand temperatures as low as -20 degrees during the winter season. On the other hand, sun exposure is essential: roses need sun for at least 6 hours a day to bloom well. It can be planted from February to May and from October to December. Good garden soil, slight limestone, preferred for good growth your roses. Preferably, you will give them deep, slightly acidic, and well-drained soil.
Formation of the cordon
It is difficult to make a two-plane trellis along the wall of a house, near a fence or a gazebo, so a cordon is used there - a single-plane horizontal method of growing. The peculiarity of growing grapes is that a long-term powerful sleeve is created, along which fruit links are located every 30 cm. Since the cordon allows you to grow old wood, the yield of such bushes is 20-25% higher. At the same time, since the position of the sleeve is inclined, after the autumn pruning of the vine, it can be bent down and covered.
However, it should not dry out too quickly. Some caution is required before landing. Dig a 30 cm hole in all directions and loosen the bottom with a shovel. A little bottom fertilizer, which will be spread at the bottom of the hole during planting, will be helpful to get started. Then set up the plant, spreading the roots and placing the collar a little below ground level, after which you fill the hole with a mixture of loose earth enriched with compost or compost, shaking the foot as and when.
Finally, be sure to generously sprinkle your foot even in rainy weather. The size is relatively simple. Gourmet, the rose is looking for fertilizer, especially in early spring. So you can bring special fertilizer for roses every year in February-March. Also remember to remove faded flowers throughout the growing season to encourage new blooms. You will be especially careful when watering in the first year, spring and summer, after planting, to ensure good painting.
 The cordon is formed in this way: in the year of planting, one long shoot is grown and in the fall it is cut off on all well-ripened wood. In the spring, this shoot is tied up in an inclined position to the bottom wire. When the kidneys begin to develop, the last one (the one near the wire) is left, and the rest are broken off. All the eyes that are above the wire are thinned out, leaving the strongest ones on the upper part of the sleeve, at a distance of 30-35 cm from each other. That is, the shoots must grow vertically. The last extreme shoot is placed horizontally - it will continue the cordon.
This rose bush with large flowers will amaze you with its exceptional flowering and deep red-red hue, your guests will also be won over! Planting a bright red Bush Bush is a matter of a few moments, but careful seeding care depends on the future recovery and vigor of the bright red Rosier bush. Just dig a hole about thirty centimeters wide and crumble deep into the ground. Take your rose bush out of its cool packaging and dip its roots into a bucket filled with thick mud made from water, garden soil, and some soils.
In the second year, all the grown shoots are cut into 2-3 buds, and the extreme horizontal one is left as long as the sleeve should be in length. During the season, two shoots grow from each pruned branch, and in the fall you need to do this: cut the lower ones into 2-3 buds to grow replacement shoots, and cut the upper ones into 5-6 buds to form fruit-bearing arrows. The cordon is renewed only in the working part.
Set your rose bush in the hole, spreading the roots well. Then fill with soil and some soil. Once packed well, finish with a generous watering. Rose bushes have generously sized flowers, especially popular in large numbers to make beautiful bouquets. Feel free to mix with annuals and perennials.
To ensure that your rose bush develops well, one of the key elements is watering: you will need to water it during the spring and summer that follow the plantation, by applying a little fertilizer. Be sure to remove faded flowers regularly. Winter is a sensitive period and will protect your rose with a winter coat and mulch. Bush size - bright red shrub in late winter. Preventively perform complex procedures from the beginning of the vegetation, then regularly thereafter.
The following year, the cordon is raised, and these arrows are horizontally tied to the lower wire to obtain a crop, and replacement shoots are grown obliquely vertically.
other methods
 One of the most interesting and very original systems is the formation of vines according to Moser. Developed by the famous wine grower Lenz Moser, the type of pruning significantly reduces the labor intensity of growing grapes. The main principles of his system are as follows:
- Selection of varieties whose frost resistance is above -20 C. The author named Zhemchug Saba, Muscat Ottonel, Riesling as the most suitable.
- Our gardeners have added Galben Nou, Victoria, Kesha 1, Timur, all Raptures, Negrul's Memory, Song, ZOS-1, Rusbol, Elegant.
- Tapestries should be placed on the southern, southeastern and southwestern slopes.
- Row spacing - 3-3.5 m.
- All working parts of the bush are formed on a stem 1.2-1.3 m high.
- Only fruit-bearing shoots are tied up at the final stage of cluster formation (so that the wind does not ruffle them and the vine does not deform), the rest hang freely.
As a result, the vines grow shorter, the internodes are short, the grapes are more dense and tasty, although ten times less labor has been spent. But, there are also disadvantages - in our latitudes, the vine may ripen poorly, and the bush may have a sloppy shape. The following year, pruning problems may arise when it is not clear where the replacement shoots are and which ones should bear fruit.
There is a legend that Ancient Greece a monument was erected to the first cutter of grapes .... a donkey. Winegrowers noticed that on bushes accidentally eaten by an animal, the next year the harvest was higher and the berries were larger. Grapes are a perennial vine. In the wild, it climbs the tallest trees, and in culture, the natural form of the vine is remade into ground bushes itself. various shapes. Unlike grapes, any fruit tree has its own characteristic shape, it is easy to recognize even among the mass of other trees. We clearly imagine what an apple tree, pear tree, apricot tree looks like, Walnut. The appearance of a grape bush in culture is very diverse.
IN Ancient Rome bushes of grapes rose on dry trees. Therefore, harvesting was difficult and life-threatening. According to the laws existing at that time, grape pickers had to make a will and provide themselves with coffin boards before starting work. The funeral expenses were borne by the owner of the vineyard.
The method of growing grapes on trees has been preserved to this day in old vineyards in Georgia and Azerbaijan. In Uzbekistan and Tajikistan, you can find the “spreading” method, in which grape bushes are spread on the ground without supports.
Modern viticulture is more perfect. Vineyards use a variety of, often quite complex, supports. Grape bushes are given rational form taking into account the variety, locality. Under the conditions of culture, the grape plant takes the form of either a low-stemmed tree, or a branchy shrub, barely rising above the ground, or covering tens and hundreds of meters of land.
Dozens of forms of grape bushes are known, which are supported by annual pruning and garters on special supports. In the uncovered zone of viticulture, large, high-stem bush formations are common. Where vine bushes have to be covered for the winter, formations are used that are convenient for shelter.
Pruning grapes is the most difficult and most responsible work in the vineyard. The formation of grapes differs from the formation of other fruit and berry plants. Beginning growers should remember that the fruit wood of grapes is last year's shoots, on which eyes are clearly distinguishable.
Pruning is done with secateurs and garden saws. The surface of the wound should be as small and smooth as possible. The cutting cheek of the secateurs is turned to the remaining part. Features of the technique of pruning annual shoots and fruit arrows are shown here. At complete removal annual shoots are cut at their very base, without going deep into the remaining wood. Perennial formations are cut off leaving a hemp 0.5-1.0 cm high. Covering varieties are cut twice: in autumn and spring. Young bushes and non-covering varieties are pruned in the spring.
Pruning limits the polarity characteristic of the vine; the strength of the growth of the bush, its individual parts and their relationship is regulated; the distribution and location in space of the vegetative and generative organs of the bush is determined; a certain shape of the bush is supported, etc.
Pruning vine bushes consists in the annual removal of 50 to 90% of last year's growth, and, if necessary, perennial parts of the bush.
Depending on the length of the vines left on the bush, there are short (up to 4 eyes), medium (for 5-8 eyes), long pruning (9 or more eyes) and mixed, combining medium and long pruning of vines for fruiting and short - replacement knots.
short pruning used for capitate and some cordon formation, on surface covering formations, when growing varieties with high fruitfulness of eyes at the base of the shoots. In the northern zone of viticulture, short pruning is used for varieties with unsatisfactory maturation of the vine, as well as for intensive-type mother liquor to obtain cuttings.
A number of varieties with short pruning have low fruitfulness of the first two eyes. These varieties are said to be intolerant of short pruning. For example, in the conditions of the northern zone of viticulture, the Malengr early variety does not develop fruitful shoots from the first eye, on average 0.2 bunches are formed from the second eye on one shoot, and 0.5 bunches on the third eye. And only on the shoots from the fourth eye develops an average of 2 clusters. In the Solovyeva-58 variety, regardless of the position of the eye on the fruit arrow, an average of 1.2 to 2.2 clusters is formed on one shoot. It follows from this that varieties similar to early Malengr should be cut into at least 5 eyes. Varieties like Solovyov-58 bear fruit well with the full length of the fruiting vines. According to D. X. Tokarev, under the conditions of the Moscow Region, with short pruning, the varieties Agat Donskoy, Aleshenkin, Cosmonaut, Moscow White, Rusven, Superranniy seedless and others bear fruit well.
Medium pruning used when pruning many varieties in non-covering and covering medium and large formations.
long pruning in the south, they are used in the cultivation of low-fruited vigorous grape varieties of the predominantly eastern group. Long cut is more in line with climatic conditions northern viticulture zone. Taking into account the fact that up to 40% or more of the buds die during overwintering, the normal load of the bushes can be ensured in some cases only due to long pruning, that is, by leaving 9-12 or more buds on the fruit vines.
Long cut is used in Guyot-type formations. With these formations, the yield of bushes is usually lower than with others, but on the other hand, the quality of the crop, the size of the clusters and berries, their appearance and the taste is much higher, which is especially important when growing table varieties.
In addition, shaping pruning is used in the vineyard, which is used to give young bushes a certain shape; pruning for fruiting adult bushes; various kinds of pruning during the growing season - green operations; anti-aging pruning; sanitary pruning used for mechanical damage to the bush, hail damage, spring frosts, pests.
In the northern viticulture zone, most varieties require various ways bush shelters for the winter to get guaranteed annual yields.
It is best for beginner winegrowers to master the culture of grapes, forming bushes according to the Guyot system. It was developed back in the middle of the last century by the famous French wine grower J. Guyot. This is the simplest and affordable way formation of grape bushes, providing good conditions for the annual harvest High Quality. In France and other Western European countries, where the grapes are not covered for the winter, the bushes have stems of various heights. For a covering culture in the conditions of northern viticulture, the formation of surface bushes according to the Guyot system without a bole is most acceptable.
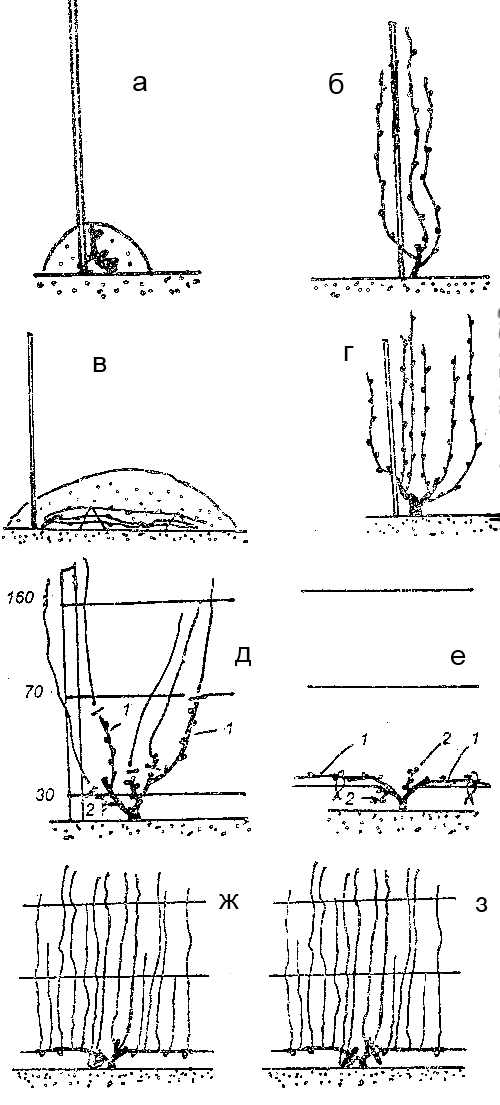
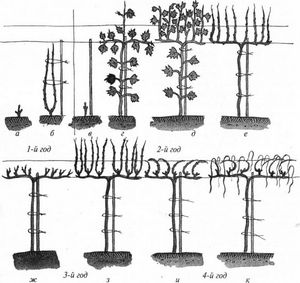
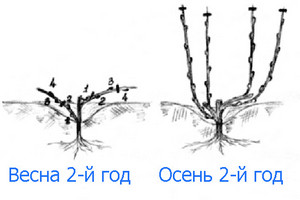
a - spring of the first year. Planted grape seedling with bare root system. From above, the above-ground part is covered with a mound of earth;
b - autumn of the first year, bush after pruning.
c - autumn of the first year, the bush is covered for the winter;
d - autumn of the second year, stepchildren, leaves, tendrils and the unripened part of the shoots were removed.
e - spring of the third year, pruning for fruiting: 1 - fruit arrow, 2 - replacement knot; e - spring of the third year, "dry" garter: 1 - fruit arrow, 2 - replacement knot.
g - autumn of the third year, bush without leaves; h - a bush after pruning, fruit arrows with shoots are cut out, replacement knots with shoots are left.
Vineyard in the first year after planting
The survival rate of the bushes, the time of entry into the first fruiting, the durability, the quantity and quality of future crops largely depend on the thoroughness of care in the first year of life. The main task of the grower in the first year is to promote the development of a strong root system in young bushes. In the first years of a plant's life, the bulk of the roots develop within the planting hole. This must be taken into account when watering, liquid feeding and sheltering plants for the winter.
The main failures of poor survival of seedlings with a shank root system are associated with the drying of the aerial part: root system does not yet have time to make up for the loss of moisture as a result of evaporation, and the eyes do not open or, having blossomed, dry up.
To prevent sprinkling of the aerial part, it is spudded with a mound of earth 5-7 cm above the top of the seedling. If a crust forms, loosen it. The soil is gradually unraveled after the start of shoot growth. It is even better to install a cone-shaped frame, covering it with a transparent film, and sprinkle the edges with soil. With the same success, you can use three-liter glass jars by putting them on planted plants. On hot days and as the shoots grow, the jar is tilted to prevent overheating.
The thermal regime of the soil is important for the survival of plants. To make the soil warm up faster, it is mulched with black or transparent film or similar materials.
Irrigation is of particular importance for the survival of plants. The first time is watered immediately after planting, the second 10-15 days after planting, the third - two to three weeks after the second watering. During hot dry periods of the growing season, you need to water more often. Watering is combined with top dressing.
Watering should not be overused. The soil around the bushes should be slightly damp, but not wet. Excess water for grape plants is much more harmful than its lack.
Green shoots should not lie on the ground: in this case, mildew and other diseases quickly develop on them. Shoots are tied to stakes as they grow in an upright position. Vine growers call this operation to fix the green shoots on the support of the green garter.
When the shoots reach a height of 80-100 cm, pinch the top. If the plants grow weakly, then pinching is carried out later, at the end of August. Purpose: to stop growth and promote the ripening of shoots. The tendrils that appear on the shoots are pinched.
In the axils of the leaves, summer and winter buds are formed. Stepchildren grow from summer buds. They are pinched after 5 leaves have appeared on them. Leave 1 - 2 sheets. This operation is called pinching. In the future, new stepchildren grow on stepchildren (stepchildren of 2-3 orders), they are cut in the same way.
Of particular danger to young plants are fungal diseases and, first of all, mildew. Do not be original: the disease is easier to prevent than to deal with it.
To prevent mildew disease, 3-4 preventive treatments should be carried out. It should be borne in mind that the timely implementation of green operations also prevents the defeat of plants by fungal diseases.
After the first autumn frost, which kills the foliage, the plants do not touch until the middle, end of October. After the first frost, there is usually a period of dry and warm weather. Shoots at this time ripen intensively.
12-15 days after the first frost, the shoots are untied, the unripened part, stepsons, antennae are cut off.
At the end of October, regardless of the prevailing weather, the plants should be covered for the winter. In dry weather, cut shoots are laid on the surface of the soil and pinned with wire hooks.
Vineyard in the second year after planting
Plant care during the second year of life is practically no different from the previous one. The main task of the grower for the second year is to grow 3-4 strong shoots 6-8 mm thick.
With the onset of warm, fine days, usually in mid-April, the bushes should be freed from winter shelter.
Then you need to check how the vines overwintered. Trial cuts are made with secateurs, starting from the top until cuts with bright green wood and bark appear. Then you need to make sure that the eyes are safe. To do this, with a sharp knife, you need to make transverse sections through the upper eyes. In live eyes, the central and lateral buds are green.
If the vine has overwintered well, pruning is carried out. They leave two lower, well-developed shoots, and on them there are 4 lower, well-developed eyes. Such short cut shoots in viticulture are called horns. If you do not cut the plants, then many weak shoots will develop, the beginning of fruiting will be delayed for many years. The purpose of this pruning is to grow at least four vines 80-100 cm long and 7-8 mm thick at the base.
If there is any doubt about the overwintering of the vines, then the final pruning should be postponed until the opening of the eyes, and only then the pruning described earlier should be carried out.
After the eyes open, a fragment is carried out, leaving one shoot from each living eye to grow. There should be no more than eight such shoots in total.
As necessary, carry out a green garter, pinching and pinching the antennae.
In mid-August, the shoots are pruned over 12-15 leaves for better maturation of the remaining vines. This technique is called chasing.
In dry and hot weather, 3-4 waterings with top dressing are carried out.
Do not forget about carrying out preventive measures against mildew.
In the autumn, before the onset of permanent frosts, the vine is removed from the support, the unripened part, stepchildren, and antennae are cut off.
The vines of neighboring bushes are pinned to the ground along a row towards each other. This is done in order to facilitate the shelter of grape bushes.
Bent vines and the soil around the bushes are sprayed with a 3% solution of copper or iron sulfate. Then the bushes cover for the winter.
Vineyard for the third year
At proper care and a friendly relationship in the third year after planting, you can expect the first harvest of sunny berries. Taking into account this circumstance, the care of plants also changes. In the spring of the third year, a trellis should be arranged to support the bushes for vines.
Bushes are released from winter shelter, as usual, in mid-April. Then you need to check how the vines overwintered.
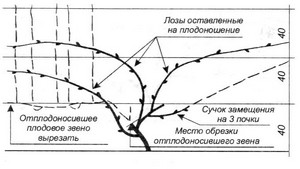
If the vine overwintered well, pruning is carried out for fruiting. Consider the best option: two horns were left on the bush and 4 shoots 6-8 mm thick at the base developed on each. Cut out the top two shoots. There are two shoots left on each horn. Now we perform the final pruning for fruiting and form two fruit links. On the upper shoot we leave 6-8 eyes - this is a fruit arrow. We cut off the lower shoot, leaving 4 eyes - this is a replacement knot. After pruning on the bush, two fruit links were obtained: a fruit arrow and a replacement knot. The bush acquired the appearance characteristic of the formation of "two-armed Guyot without a trunk."
If three shoots formed on the horn last year, then we cut out the top one, and cut the rest as described above: the top one - on the fruit arrow and the bottom one - on the replacement knot. Regardless of the formation, the fruit arrow should always be above the replacement knot.

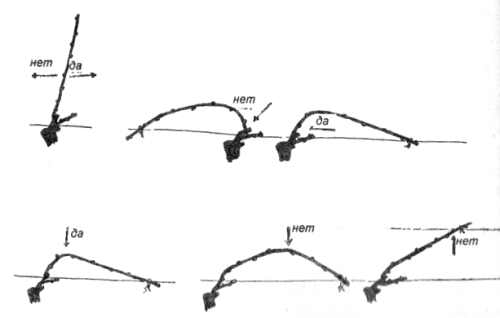
The relative position of the replacement knot (1) and the fruit arrow (2) during pruning
And if only one shoot has formed on the horn, then it is better to cut it into 4 eyes. You need to think about the future and grow a strong bush, and not weaken it with premature fruiting.
If the shoots are thinner than 6 mm, then it is also better to postpone the beginning of fruiting until next year. In this case, they are cut in the same way as in the spring of the second year: one shoot is left on each horn, and 4 eyes on them.
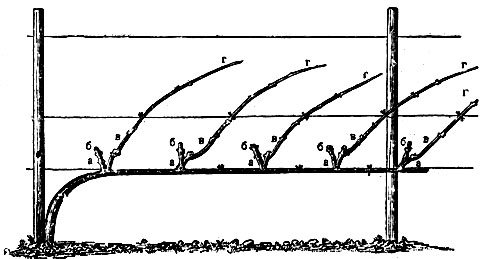
After trimming, proceed to the "dry" garter. Dry (as opposed to green), because dry vines are tied up. Fruit arrows are tied horizontally, in different directions from the bush. I tie the fruit arrows in several places with twine in the form of a figure eight, taking into account the growth of the vines in thickness. Features of the "dry" garter ":
The following very important works are green operations: fragments, green garters, pinching, pinching, chasing.
Timely carry out watering and top dressing. Do not forget to carry out preventive treatments against diseases.
2-3 weeks after the first autumn frost, they begin to prepare the bushes for shelter for the winter. First, the entire vine is completely removed from the trellis. Then the unripened part is cut off, stepsons and antennae are cut out. After that, fruit arrows are cut out with all the vines. Only replacement knots with shoots grown on them remain. Bushes take the form, as in the autumn of the second year: two horns remain with 4-8 shoots.
So, the formation according to the Guyot system without a trunk is completed. Now it remains to support it annually. Pruning is carried out twice: in the fall - preliminary and in the spring - final. During autumn pruning, fruit arrows with shoots grown on them are completely cut out. On the shoots grown on the replacement knots, the stepchildren, the unripened part, the mustache are removed. Cropped bushes cover. In the autumn of the third year, the bushes again take on the same appearance as in the spring of the previous year: after pruning, 4 to 6 annual vines remain on them. Prepruning is now done annually.
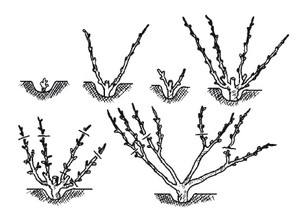
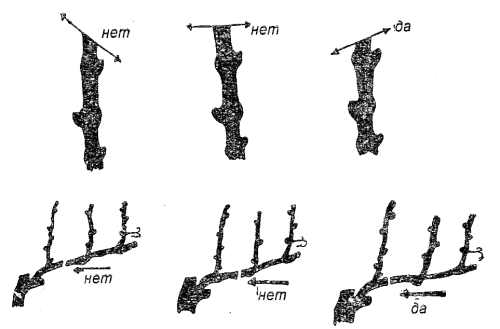
Features of pruning fruit-bearing bushes, taking into account the degree of development of shoots on replacement knots, are shown here. With the normal development of shoots on the replacement knot, the fruit arrow is completely cut out in the fall. But it also happens that very weak, thin shoots have grown on the replacement knot. In this case, the replacement knot is cut into a ring in the fall, without leaving a hemp. Two strong shoots are left on the fruit arrow, located as close as possible to the base of the bush. It may also be that one strong shoot has formed on the replacement knot. When pruning, we leave it and additionally leave one or two more shoots. FROM right side The figure shows spring pruning.
Pruning with two (A), one (B) normally developed and slightly developed (C) shoots on replacement knots. Left - before trimming, Right - after trimming
In order not to change the shape of the bush in subsequent years, you should follow some rules. Replacement knots must be left directly on the head of the bush, special attention should be paid to the choice of fruit arrows. They should be well developed, long enough and well placed. The length of fruit arrows should not exceed the distance between the bushes. If, for some reason, the eyes on the replacement knots have not blossomed, then coppice shoots that usually appear on the head of the bush, or shoots that have grown at the base of the fruit arrow, are used as replacement knots. In case of severe death of the eyes, or if the shoots are short due to poor ripening in the previous year, not two fruit arrows are left, but three or four. All of them are tied to the first wire.
When mastering the formation of Guyot, the grower gets acquainted with the biological characteristics of various grape varieties, acquires basic skills in caring for the bushes. It is also very important to overcome the psychological barrier when pruning bushes. At first glance, the annual removal of 70-90% of the above-ground part of the bush seems unnatural. But you should not be afraid of this, because the grape bush annually forms much more buds, shoots and clusters than it can provide with normal nutrition.
When gartering, dry annual shoots are placed horizontally, and the green ones that have grown from them are placed vertically at a slight angle. Thus, the undesirable influence of polarity is overcome and conditions are created for the uniform development of all green shoots, the light and thermal conditions of the bush are improved, the mass of clusters, their appearance and taste of berries increase.
Having mastered the features of Guyot's formation, one can move on to other, more complex and larger, and therefore more productive forms of the bush, since its elements enter into other forms in the form of a fruit link (replacement knot, fruit arrow).
Fan formations- one of the most common. There are many modifications of fan formations, which differ in size, number and length of sleeves, the presence and absence of a bole, and other features. All of them are more productive compared to the Guyot formation. Fan formations are characterized by the presence of at least three sleeves, which are placed along the trellis in the form of a fan. Hence the name of these bush forms - fan. On each sleeve, as a rule, one fruit link is formed, consisting of a fruit arrow and a replacement knot. With large fan formations, there may be several fruit links on one sleeve. For covering vine bushes, mainly surface fan formations without a stem are used. For winter-hardy varieties, a large fan-shaped formation with sleeves of different lengths can be used.
Fanless stemless formation. This form of the bush is more complex than Guyot and for the inexperienced grower is fraught with many surprises and troubles. Bushes are easily overloaded: they form much more fruitful shoots than the bush is able to provide with nutrients. This leads to the fact that at a young age the bushes lag behind in growth and development. Adult bushes thicken when overloaded, more affected by diseases. Fruits are poorly tied on them, the vine ripens worse and the ripening of berries is delayed.

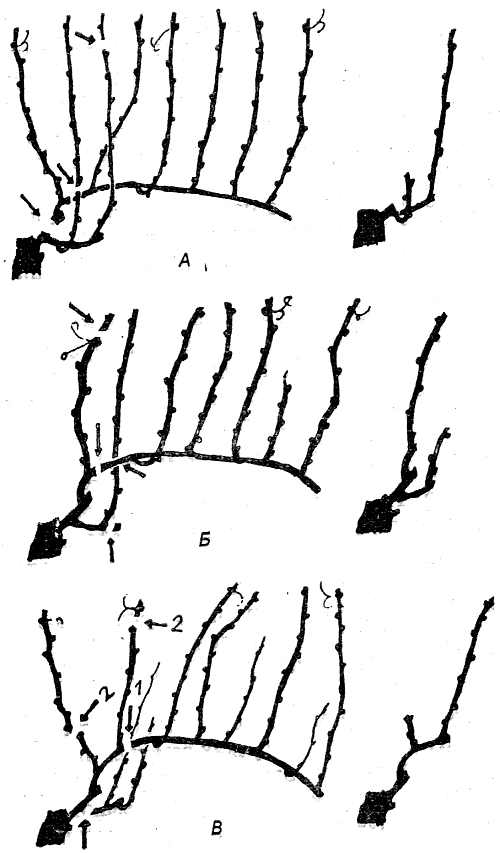
Pruning of a fanless stemless formation: A - the third year. 1 - spring; 2 - autumn.
First and second years. Pruning and care of plants are the same as in the formation of Guyot.
Third year. In the spring of the third year, with the normal development of the bushes, they begin to create sleeves. By this time, the bush should have at least four shoots 80-100 cm long and 6-8 mm thick. Shoots are cut to the length of future sleeves. The inner two sleeves should be somewhat shorter and reach the first wire of the trellis. The two extreme shoots are left longer in an inclined position, they should also reach the first wire so that the bushes can be easily covered in the future, the length of the sleeves should be at least 50 cm. After pruning, the shoots are tied to the first wire of the trellis in the form of a fan.
After the shoots reach a length of 8-10 cm, a green fragment is carried out. On each sleeve, 2 - 3 upper shoots are left, and the rest are broken out. One of the left green shoots (upper) on next year will be cut off on the fruit arrow, and the second (lower) - on the replacement knot. In the future, green shoots are tied vertically to wire trellises. This shaping requires a four-wire trellis. In autumn, before shelter, the unripened part of the shoots is removed, stepchildren and antennae are cut out.
Fourth year. In the fourth year, fruit links are already being formed on each sleeve. As a fruit arrow, the upper vine is left on the sleeve, cutting it into 4-6 eyes. The lower vine is cut into a replacement knot - by 2-3 eyes. A fruit link will be formed from it for the next year.
B - the fourth year; B - sleeve cutting technique
After pruning, they immediately proceed to a dry garter. Fruit arrows are tied with strong twine, very tight, horizontally to the bottom wire of the trellis. They are placed so that in the future the green shoots are evenly located in the plane of the trellis. In autumn, the fruiting vine is removed, and only shoots on the former replacement knot are left on each sleeve. Vines on replacement knots are cleared of stepchildren, mustaches and the unripened part of the shoot. Such autumn pruning practice annually.
Fifth and subsequent years. During spring pruning, one fruit arrow and one or two replacement knots are annually left on each sleeve. The length of fruit arrows in subsequent years is regulated in the spring, depending on the strength of the growth of the bush and the degree of winter damage to the eyes. If necessary, two fruit arrows can be left on one sleeve. The load in this case is regulated during the fragmentation of green shoots. In the future, the grower maintains this form of the bush, rejuvenates the sleeves in a timely manner.
In the suburbs, winegrowers have developed Moscow small bezshtambovy fan-shaped bush. Its description is given according to D. Kh. Tokarev (1993). In the spring after planting, the seedlings are not pruned, but the annual shoot is tied up horizontally. In autumn, 2 shoots are left: the first from the base of the bush and the last, the rest are cut out.
In the spring of the second year, last year's shoots are tied horizontally to create sleeves. In the autumn of the second year, the first shoot from the base is left on one sleeve, and the last on the other. In varieties that bear fruit well with short pruning, 4-5 eyes are left on each shoot; in varieties that bear fruit well with medium pruning, 6-8 eyes are left. In the spring of the third year, last year's shoots are tied up horizontally: with short pruning towards each other, with medium pruning, both shoots are in the same direction. In the autumn of the third year, in varieties with short pruning, the first shoots from the base are left; in varieties with medium pruning, the first shoot is left on one sleeve, and the last on the other.

Moscow small non-stem fan formation: 1 - spring of the 1st year; 2 - autumn of the 1st year; 3 - spring of the 2nd year; 4 - autumn of the 2nd year; 5 - spring of the 3rd year; 6 - autumn of the 3rd year; (according to D.Kh. Tokorev)
With this formation, the bushes are planted in a row after 0.7-1.0 m, and between rows after 1.5 m. Replacement knots are left only when they want to replace the sleeves. If the bushes are covered according to the “dry method”, then the sleeves serve up to 10-12 years. In subsequent years, in a similar way, the number of sleeves can be increased to 4-6.
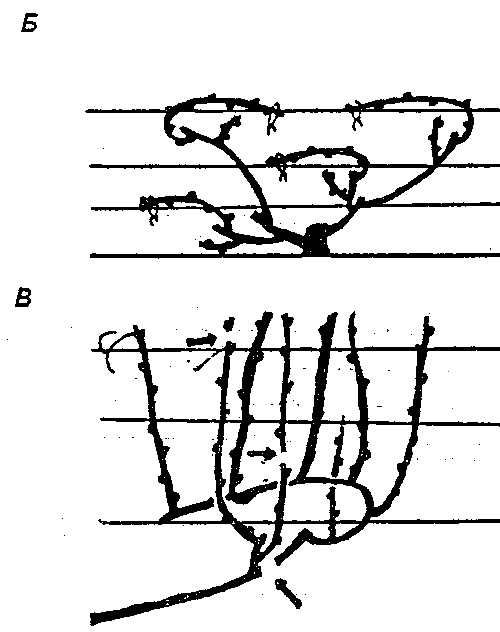
Large fan formation used in wall culture, for landscaping when arranging gazebos, galleries, trellises. It differs from the usual fan-shaped formation in the longer sleeves and the presence of several fruit arrows and replacement knots on each sleeve. The length of individual sleeves exceeds 1 m. The principle of deriving this formation is the same as that of the four-arm fan. To lengthen the sleeves, vines from the upper eyes are used. On the sleeves, after 40-60 cm, fruit links are created. In this form of a bush, the number of sleeves can be more than four. They are created for many years and are updated only in case of mechanical and severe winter damage. Over time, the sleeves thicken significantly and turn into a kind of trunks, on which, in turn, the sleeves are placed. The principle of replacing and trimming fruit links is the same as with the four-arm fan formation. For this formation, the most winter-hardy varieties are used.

large formations; 1 - vertical cardon; 2 - a large fan formation on a trellis; 3 - she is on the gazebo; 4 - it is in the wall culture.
Half-fan shaping, or one-sided fan shaping. Allows you to more evenly, without thickening, place green shoots on the trellis and makes it easier to shelter the bushes for the winter. All bushes formed in that shape have sleeves pointing in the same direction. The semi-fan formation is derived according to the same principles as the fan formation. Usually they form 3 sleeves 50, 80 and 100-110 cm long. To rejuvenate obsolete sleeves, a restoration knot is left near the surface of the earth at the base of the sleeve, cutting it into 3-4 eyes or using coppice shoots. One-sided long-sleeved shaping is widely used in backyard viticulture in Ukraine, the North Caucasus. For example, the famous Kharkov winegrower V. I. Gudzenko, using this formation, posted on his suburban area about 600 vines.
One-sided long-sleeved formation consists of 1, 2, less often 3 sleeves from 100-120 to 150-200 cm long, depending on the distance between plants in a row and the height of the vines. Bushes in a row can be planted through: 50-60, 1.25-1.5, 2.0 m, and a row from a row after 2-4 m. On each sleeve, 2-3 branches are created with fruit arrows and substitution knots .
The trellis for this formation is three-tiered, with the lower tier placed at a height of 70 cm, the second - 120 cm, the third - 160 cm with two parallel wires.
Forming allows you to create various designs of plantations with the placement of clusters at a height of 70, 100, 130 cm, with free placement of growth and yield. It can be used on special tapestries - two-plane, pergola, etc.
Unilateral fan forming: A - the third year; B - the fourth year (on the left - before spring pruning, on the right - after pruning and dry garter); B - fifth year
Multi-tiered bilateral cordon Kazenava can be used for landscaping, using winter-hardy varieties. In the first year after planting, it is necessary to grow 1-2 strong shoots. The following spring, one, the strongest shoot is left, cutting it into 5-6 eyes. When the green shoots reach 5-10 cm, they are cut off, leaving 3 top shoots. In the spring of the third year, the two lower shoots are cut into 4-6 eyes each and tied horizontally to the first wire. The upper shoot is tied up vertically and cut off at a distance of 60-70 cm from the first wire. It serves as a continuation of the future trunk. After the green fragments, the top three green shoots are again left on it. In subsequent years, the lengthening of the cordon up and to the sides is carried out until the area allotted for the bush is completely filled. Shoots that are tied horizontally form sleeves. Fruit links are formed on the sleeves, consisting, as usual, of a fruit arrow and a replacement knot. The distance between the sleeves should be such that the green shoots on them can develop freely and do not obscure each other. The distance between the fruit links on the sleeves is at least 50 cm. On each fruit link, fruit arrows are formed from 5-8 eyes and a replacement knot. The renewal of fruit links is carried out in the same way as with a large fan formation.

Formation of the Kazenava cordon: 1 - the third year after planting; 2 - fourth year; 3 - fifth year.
For wall forming fits good vertical cordon. I.S. Bukhtik, a resident of the city of Luninets (Belarus), using this formation, planted about 30 grape bushes near the walls of his wooden house and barn. Plants are placed at a distance of 30 cm from the walls and 1 m in a row. The height of the trellis is up to 3 m, the wires are placed every 40 cm.
To breed this form in the spring of the second year, when pruning, one shoot with 4-5 eyes is left. After bud break, one or two upper shoots are left, and the rest break off. Green shoots are tied vertically to the trellis wire.
In the spring of the third year, 2-3 eyes are left side by side every 40-60 cm, and the remaining eyes are blinded, that is, they are broken out during their blooming or cut out. With a green fragment in each such tier, only two shoots are left and directed in different directions.
In subsequent years, a fruit link is formed on each tier. First, 3-4 eyes are left on each of the two shoots of the tier, and the next year they are cut into a replacement knot and a fruit arrow.
Features of pruning fruit links on large formations are shown in the figure.
![]()
Pruning the fruit link by year. A - a four-year link; B - five-year link: 1,2,3 - fruit arrows, 4 - fruit arrows, 5 - replacement knots
Shaping for gazebo and gallery culture. Following the example of residents of southern cities, a grape bush can be brought to balconies high-rise building. Grape bushes decorating multi-storey buildings can be found in Brest, Pinsk, Minsk and other cities of Belarus. For this purpose, the most winter-hardy varieties are used. Plants are planted at a distance of 80-100 cm from the walls and after 100-150 cm.
The bush is first formed into one trunk, without branches, immediately fixing in a vertical position. To do this, annually break off all green shoots, except for the upper well-developed. When the stem is formed, i.e., brought to the required height (for example, to the level of the balcony of the second floor), sleeves are formed on it, and on them, in turn, fruit links, as in the formation of a vertical cordon or Kazenava cordon. In a similar way, a bush can be formed to a height of 3-6 floors.
To tie the bushes on the balconies, they build something like a trellis from thin tubes, wire and other improvised materials. A dry vine and green shoots are attached to such a support. Green shoots can not be tied up, giving them the opportunity to be freely located in space.
When caring for such bushes, you can use the advice of the ancient Roman writer Cato the Elder: “Look at the grapes, take care like this: tie a well-cleaned vine straight so that it does not bend, lead it all the time up as long as you can. Leave fruit shoots and those with which the vine is renewed, act correctly. Make the vine grow as high as possible and tie it properly, do not tighten too much ... Cut old vines as little as possible.